<?xml version="1.0" encoding="utf-8"?><feed xmlns="http://www.w3.org/2005/Atom" ><generator uri="https://jekyllrb.com/" version="4.4.1">Jekyll</generator><link href="https://dunkels.com/adam/feed.xml" rel="self" type="application/atom+xml" /><link href="https://dunkels.com/adam/" rel="alternate" type="text/html" /><updated>2026-05-05T08:04:14+00:00</updated><id>https://dunkels.com/adam/feed.xml</id><title type="html">Adam Dunkels</title><subtitle>The homepage of Adam Dunkels</subtitle><entry><title type="html">It Isn’t The Emdashes — It’s The Words: 32 Ways Your Writing Looks Like an AI Wrote it</title><link href="https://dunkels.com/adam/signs-your-text-was-written-by-an-ai/" rel="alternate" type="text/html" title="It Isn’t The Emdashes — It’s The Words: 32 Ways Your Writing Looks Like an AI Wrote it" /><published>2026-05-03T00:00:00+00:00</published><updated>2026-05-03T00:00:00+00:00</updated><id>https://dunkels.com/adam/signs-your-text-was-written-by-an-ai</id><content type="html" xml:base="https://dunkels.com/adam/signs-your-text-was-written-by-an-ai/"><![CDATA[<p>We all know people use AI to write their texts. And we all know they tend to have a similar feel to them. There is something with those texts that makes them look like other texts. We instinctively <em>feel</em> that there is something about them that just smells AI. But what is it?</p>

<p>I asked Claude, ChatGPT, and Gemini to generate a bunch of blog posts, product announcements, and emails on different topics. I looked at them for a while, trying to see what the similarities were, before I realized that I should just ask Claude to read them to find the recurring patterns.</p>

<p>So I asked Claude and Claude found 32 patterns. They match what we’ve all been noticing when reading thing online for the past months. Any human might write “it’s worth noting” once. But when “it’s worth noting” and “at the end of the day” and three em-dashes and a “simple yet powerful” all appear in the same paragraph, maybe it wasn’t written by a human.</p>

<p>Or maybe it was written by a human, but readers will still think it was written by an AI.</p>

<p>In any case, here are the 32 patterns that the AI found:</p>

<h2 id="instant-tells">Instant tells</h2>

<p>Those are the easiest ones to spot. We will pick up on them by just glancing at the text.</p>

<table>
  <thead>
    <tr>
      <th>Pattern</th>
      <th>Example</th>
      <th>Fix</th>
    </tr>
  </thead>
  <tbody>
    <tr>
      <td><strong>Em-dash overuse.</strong> Dashes bolting parenthetical asides onto sentences. One per document maybe is fine, but not more.</td>
      <td>“Our framework — which we spent months refining — offers developers — regardless of experience — a better workflow.”</td>
      <td>“Our framework offers developers a better workflow. We spent months refining it.”</td>
    </tr>
    <tr>
      <td><strong>“Not X, it is Y” constructions.</strong> Contrastive framing where the negation adds nothing.</td>
      <td>“This is not about speed, it is about reliability.”</td>
      <td>“This is about reliability.”</td>
    </tr>
    <tr>
      <td><strong>Filler phrases.</strong> Phrases that carry zero meaning. AI models love them: “it’s worth noting”, “delve into”, “leverage”, “nuanced”, “landscape.”</td>
      <td>“It’s worth noting that we leveraged a nuanced approach to navigate the compliance landscape.”</td>
      <td>“We built the compliance checks into the deploy pipeline.”</td>
    </tr>
    <tr>
      <td><strong>Marketing language.</strong> Adjectives that seem to sell instead of describe. “Powerful”, “seamless”, “revolutionary”, “game-changing.” These words mean nothing because they describe anything.</td>
      <td>“A powerful, seamless solution that revolutionizes your workflow.”</td>
      <td>“It runs your deploys in parallel and cuts wait time from twelve minutes to two.”</td>
    </tr>
    <tr>
      <td><strong>Generic openings.</strong> Opening sentences that could begin any article ever written.</td>
      <td>“In today’s rapidly evolving digital landscape, developers face unprecedented challenges.”</td>
      <td>“Our deploy pipeline broke three times last week. Same root cause each time.”</td>
    </tr>
    <tr>
      <td><strong>Paired adjectives with “yet.”</strong> “Simple yet powerful.” “Elegant and robust.” Pick the one that matters.</td>
      <td>“A lightweight yet comprehensive testing framework.”</td>
      <td>“A testing framework that runs the full suite in four seconds.”</td>
    </tr>
    <tr>
      <td><strong>“Excited to announce” openers.</strong> Instead of just stating what happened.</td>
      <td>“We’re thrilled to announce the launch of our new API!”</td>
      <td>“The new API shipped today. Here’s what changed.”</td>
    </tr>
    <tr>
      <td><strong>“Whether you’re X or Y” false inclusivity.</strong> Pretending to address two audiences when you’re addressing one.</td>
      <td>“Whether you’re a startup founder or an enterprise architect, this tool fits your needs.”</td>
      <td>“If you’re running a small team and your deploy takes longer than your lunch break, keep reading.”</td>
    </tr>
    <tr>
      <td><strong>Faux-conversational pivots.</strong> “Here’s the thing:”, “Let me be clear:”, “The truth is:” Filler before the actual point.</td>
      <td>“Here’s the thing: most teams don’t actually need microservices.”</td>
      <td>“Most teams don’t actually need microservices.”</td>
    </tr>
    <tr>
      <td><strong>Corporate cliches.</strong> “Move the needle”, “growth mindset”, “synergy”, “paradigm shift.” These existed before AI, but AI amplified them.</td>
      <td>“We’re doubling down on our growth mindset to move the needle on developer experience.”</td>
      <td>“We’re making the CLI faster. That’s it.”</td>
    </tr>
    <tr>
      <td><strong>Triple-value lists.</strong> Three abstract virtues in a row. Sounds principled (but rarely says anything).</td>
      <td>“We believe in transparency, innovation, and excellence.”</td>
      <td>“We publish our incident reports within 24 hours, including what went wrong and what we’re fixing.”</td>
    </tr>
  </tbody>
</table>

<h2 id="weakeners">Weakeners</h2>

<p>These don’t scream AI, but AI tends to write them, so it piles up.</p>

<table>
  <thead>
    <tr>
      <th>Pattern</th>
      <th>Example</th>
      <th>Fix</th>
    </tr>
  </thead>
  <tbody>
    <tr>
      <td><strong>Rhetorical questions as section openers.</strong> Questions filling the space where a statement should go.</td>
      <td>“What if you could deploy with zero downtime?”</td>
      <td>“Zero-downtime deploys used to require a custom load balancer. Now the standard tooling handles it.”</td>
    </tr>
    <tr>
      <td><strong>Passive voice as habit.</strong> “It was found that…”, “it was determined…”</td>
      <td>“It was determined that the memory leak originated in the cache layer.”</td>
      <td>“We traced the memory leak to the cache layer.”</td>
    </tr>
    <tr>
      <td><strong>Excessive hedging.</strong> AI hedges because it’s trained to be non-committal. The result reads like someone afraid to state a fact.</td>
      <td>“It could be argued that perhaps this approach might not be ideal for all use cases.”</td>
      <td>“This breaks on datasets over 10GB.”</td>
    </tr>
    <tr>
      <td><strong>Meta-references.</strong> Text referring to itself. The reader knows they’re reading the post.</td>
      <td>“In this article, we’ll explore five strategies for reducing build times.”</td>
      <td>“Five changes cut our build time from eight minutes to ninety seconds.”</td>
    </tr>
    <tr>
      <td><strong>Mechanical transitions.</strong> “Furthermore”, “Moreover”, “Additionally.” Feels like you couldn’t connect two ideas naturally.</td>
      <td>“The API is fast. Moreover, it handles errors gracefully. Furthermore, it scales horizontally.”</td>
      <td>“The API is fast. It also recovers from failures on its own and scales horizontally without config changes.”</td>
    </tr>
    <tr>
      <td><strong>Bold emphasis in body copy.</strong> Wrapping phrases in bold to highlight selling points.</td>
      <td>“Deploy with <strong>zero configuration</strong> and <strong>instant rollbacks</strong>.”</td>
      <td>“It deploys without config files. Rolling back takes one command.”</td>
    </tr>
    <tr>
      <td><strong>Scare quotes.</strong> Quotation marks for emphasis around ordinary words.</td>
      <td>“The tool ‘seamlessly’ integrates with your existing stack.”</td>
      <td>“The tool reads your existing config files. No migration step.”</td>
    </tr>
    <tr>
      <td><strong>Section-end summaries.</strong> Restating what was just said. AIs do this maybe because they were trained on textbooks.</td>
      <td>[three paragraphs about caching]… “As we can see, caching is an effective strategy for improving performance.”</td>
      <td>End after the last substantive point. Trust the reader.</td>
    </tr>
    <tr>
      <td><strong>Exclamation mark clusters.</strong> More than one per paragraph. The excitement feels performed.</td>
      <td>“The results were incredible! We saw a 3x improvement! The team was thrilled!”</td>
      <td>“We saw a 3x improvement. Nobody expected that.”</td>
    </tr>
    <tr>
      <td><strong>Repetitive “You” sentence starters.</strong> 3+ consecutive sentences starting with “You.”</td>
      <td>“You open the dashboard. You click deploy. You wait for the build. You check the logs.”</td>
      <td>“Open the dashboard, click deploy, wait for the build. The logs update in real time.”</td>
    </tr>
    <tr>
      <td><strong>Hashtag blocks.</strong> #CamelCase hashtags appended to text (particularly for social media posts).</td>
      <td>“Just shipped our new feature! #DevOps #CloudNative #BuildInPublic #StartupLife”</td>
      <td>Delete them.</td>
    </tr>
    <tr>
      <td><strong>Emoji as emphasis.</strong> Decorative emoji used for energy instead of words.</td>
      <td>“Just launched! 🚀🔥✨ Check it out! 💯”</td>
      <td>“Just launched. Here’s the link.”</td>
    </tr>
    <tr>
      <td><strong>Uncontracted forms.</strong> “It is”, “do not”, “is not” throughout.</td>
      <td>“It is important to note that you do not need to configure this manually. It is handled automatically.”</td>
      <td>“You don’t need to configure this manually. It’s handled automatically.”</td>
    </tr>
    <tr>
      <td><strong>Heading emoji.</strong> Decorative emoji at the start of markdown headings. ChatGPT does this a lot.</td>
      <td>”## 🚀 Getting Started”</td>
      <td>”## Getting started”</td>
    </tr>
    <tr>
      <td><strong>Informal corporate slang.</strong> Metaphorical jargon passed off as casual. “Unpack this”, “deep dive”, “low-hanging fruit.”</td>
      <td>“Let’s unpack this and do a deep dive into the low-hanging fruit.”</td>
      <td>“Three changes fix most of the problem. Start there.”</td>
    </tr>
    <tr>
      <td><strong>Internet cliches.</strong> Phrases from a few years ago that were mined by the AIs. “Hits different”, “chef’s kiss”, “rent-free”, “let that sink in”, “you can’t unsee it”, “tell me you X without telling me you X.”</td>
      <td>“Once you spot the em-dash habit, you can’t unsee it. The way every model defaults to it hits different.”</td>
      <td>“Once you spot the em-dash habit, you start seeing it everywhere. Every model defaults to it.”</td>
    </tr>
  </tbody>
</table>

<h2 id="statistical-patterns">Statistical patterns</h2>

<p>Those are a little more subtle.</p>

<table>
  <thead>
    <tr>
      <th>Pattern</th>
      <th>Example</th>
      <th>Fix</th>
    </tr>
  </thead>
  <tbody>
    <tr>
      <td><strong>The word “very.”</strong> Weakens specificity. Humans use it too, but AI uses it as a default intensifier on everything.</td>
      <td>“The response times were very fast.”</td>
      <td>“Response times averaged 12ms.”</td>
    </tr>
    <tr>
      <td><strong>Typographic quotes.</strong> Curly quotes instead of straight. Most keyboards produce straight quotes but AI models often output curly ones.</td>
      <td>“Hello world” (curly)</td>
      <td>“Hello world” (straight)</td>
    </tr>
    <tr>
      <td><strong>Repetitive word use.</strong> Same word 3+ times in a short span. AI repeats a word until the context window moves on.</td>
      <td>“The framework provides a robust foundation. This robust architecture ensures robust performance.”</td>
      <td>“The framework provides a solid foundation. The architecture holds up under load.”</td>
    </tr>
    <tr>
      <td><strong>Sentence length uniformity.</strong> 4+ consecutive sentences of similar word count. AI tends to produce metronomic lengths.</td>
      <td>Four consecutive 15-word sentences in a row.</td>
      <td>Mix short and long deliberately.</td>
    </tr>
    <tr>
      <td><strong>Repeated thematic points.</strong> AIs seem to re-derive their thesis in every section instead of advancing the argument.</td>
      <td>Three sections each opening with a variant of “any one of these means nothing, but together they signal AI.”</td>
      <td>Make the point once, in the strongest place. Cut or replace the weaker restatements with claims that move the piece forward.</td>
    </tr>
  </tbody>
</table>

<h2 id="what-to-do-about-it">What to do about it?</h2>

<p>One old-school trick is to write by hand. But even when we do write by hand, our own context windows may have been poisoned by all the AI texts that we read everywhere. So people may think our texts were written by an AI even if they weren’t.</p>

<p>So I built two tools that do it automatically: an <a href="https://adamdunkels.github.io/is-it-slop/">in-browser slop detector</a> where you paste text and get instant feedback, and a <a href="https://github.com/adamdunkels/deslop-text">Claude Code skill called deslop-text</a> that catches and fixes these in your working files.</p>

<p>Those tools work equally well if your text was written by hand or by an AI.</p>]]></content><author><name>adam</name></author><category term="AI" /><category term="Just for Fun" /><summary type="html"><![CDATA[We all know people use AI to write their texts. And we all know they tend to have a similar feel to them. There is something with those texts that makes them look like other texts. We instinctively feel that there is something about them that just smells AI. But what is it?]]></summary><media:thumbnail xmlns:media="http://search.yahoo.com/mrss/" url="https://dunkels.com/adam/assets/images/signs-your-writing-looks-like-ai/ai-image.webp" /><media:content medium="image" url="https://dunkels.com/adam/assets/images/signs-your-writing-looks-like-ai/ai-image.webp" xmlns:media="http://search.yahoo.com/mrss/" /></entry><entry><title type="html">Can we Vibe Code a Smart Home Device with Matter?</title><link href="https://dunkels.com/adam/vibe-code-smart-home-matter-device/" rel="alternate" type="text/html" title="Can we Vibe Code a Smart Home Device with Matter?" /><published>2026-04-27T00:00:00+00:00</published><updated>2026-04-27T00:00:00+00:00</updated><id>https://dunkels.com/adam/vibe-code-smart-home-matter-device</id><content type="html" xml:base="https://dunkels.com/adam/vibe-code-smart-home-matter-device/"><![CDATA[<p>Developing a smart home product <a href="/adam/developer-profiles-iot-projects/">takes serious effort</a>. Can AI make it easier? Let’s try to vibe code a working prototype of a smart home product with the Matter smart home standard, which <a href="https://www.theverge.com/news/814241/ikea-smart-home-matter-thread-lights-sensors-remote-control">major players like IKEA</a> have bet big on, and see where it gets us.</p>

<p>We got it to work. AI agents built a full Matter system with embedded firmware, Thread networking, a border router, and an Android commissioning app. What used to take weeks of setup took days. Here is what we learned.</p>

<p>What makes Matter interesting is that it may not be mainstream enough for AI models to be specifically trained on, so the agents will have to do a lot of work on their own to learn the system on the fly. And there is lots to learn: how to build firmware, how to set up the networking, how to build an Android app for it. There are <a href="https://docs.silabs.com/matter/2.1.0/matter-thread-getting-started/03-light-switch-step-by-step-example">step-by-step examples to follow</a>, which can be intimidating for humans, but which should be easy enough for agents to follow. But will that be enough for a set of AI agents to create a working system?</p>

<h2 id="with-matter-even-a-simple-setup-is-complex">With Matter, Even a Simple Setup is Complex</h2>

<p><a href="https://en.wikipedia.org/wiki/Matter_(standard)">Matter</a> is an ambitious wireless standard: it has support from major players, including both Google and Apple, and is defined over both WiFi and the <a href="https://en.wikipedia.org/wiki/Thread_(network_protocol)">IEEE 802.15.4-based standard called Thread</a>. Internally, the Matter system is built around IPv6 and requires significant insight into how IPv6 works to set up. But when Matter is used in <a href="https://www.ikea.com/global/en/newsroom/retail/the-new-smart-home-from-ikea-matter-compatible-251106/">consumer grade smart home systems</a>, this complexity is completely hidden inside the Matter devices and the Matter hub.</p>

<p>The <a href="https://github.com/project-chip/connectedhomeip/">code base is open source</a>, which gives our agents
a fighting chance, but it is large (23k+ files), consists of multiple submodules (~100),
supports hardware from 12 different vendors, and can be difficult to work with</p>

<p>To build a Matter smart home system from scratch, we need the following components:</p>

<ul>
  <li>The firmware for embedded development boards, one as the smart home device, and one as the border router. We use <a href="https://www.silabs.com/development-tools/wireless/efr32xg24-dev-kit?tab=overview">the Silicon Labs xG24 kit</a></li>
  <li>One Android app, to work with our Matter system</li>
  <li>A regression testing framework to ensure that the resulting system works</li>
</ul>

<p>Thus the setup we want the AI agents to work on is something like this:</p>

<ul>
  <li>A <a href="https://containers.dev/">devcontainer</a> in which all the development tools live so that we can compile the code without installing tools on our laptop</li>
  <li>A full Matter installation inside the devcontainer so that the agents can build the appropriate firmware</li>
  <li>A border router setup that can be run inside the devcontainer, instead of having a separate Raspberry Pi board</li>
  <li>An Android development environment that the agents can use to develop and build the Android app</li>
</ul>

<p>Then we instruct the agents to build a system with a Matter lightbulb (running on one of the development boards), one Matter hub radio control board (using the other development board), and one Android app (running on an actual Google Pixel 6a phone).</p>

<p>The different components need to work together over multiple wireless media using different protocols. The structure of the setup looks like this (as a <a href="https://authors.ietf.org/diagrams">classic RFC style diagram</a>):</p>

<div class="language-plaintext ascii-diagram highlighter-rouge"><div class="highlight"><pre class="highlight"><code>+-------------------------------------------+
|               Android Phone               |
+---+-----------------------------------+---+
    |                                   |
 BLE (PASE)                        WiFi / UDP
commissioning                  CASE + On/Off control
    |                                   |
    |                                   |
    |    +------------------------------+----------+
    |    |  Windows Host                |          |
    |    |                              |          |
    |    |  +---------------------------+-----+    |
    |    |  |  Devcontainer                   |    |
    |    |  |                                 |    |
    |    |  |  +-------------+ +-----------+  |    |
    |    |  |  | otbr-agent | | socat CASE |  |    |
    |    |  |  | (border    | | relay      |  |    |
    |    |  |  |  router)   | |            |  |    |
    |    |  |  +------------+ +------------+  |    |
    |    |  |  +---------------+              |    |
    |    |  |  | avahi         |              |    |
    |    |  |  | _matter._tcp  |              |    |
    |    |  |  | SRP server    |              |    |
    |    |  |  +---------------+              |    |
    |    |  +------+-------------------+------+    |
    |    |         |                   |           |
    |    |         | Spinel/UART       | UART      |
    |    |         |                   |           |
    |    +---------+-------------------+-----------+
    |              |                   |
    |              |                   |
    |    +------+-----------+  +----+-------------+
    |    | xG24 RCP Board   |  | xG24 Lighting    |
    |    | OT RCP firmware  |  | Matter light fw  |
    |    +------------------+  +------------------+
    |              |                      |  |
    |              |  Thread (802.15.4)   |  |
    |              +----------------------+  |
    |                                        |
    |                                        |
    |         BLE (PASE) commissioning       |
    +----------------------------------------+

</code></pre></div></div>

<p>That’s a lot of complexity for what amounts to turning on and off an LED.</p>

<p>Now let’s let our AI agents loose on the setup and see what they achieve.</p>

<h2 id="what-did-the-ai-agents-build">What Did the AI Agents Build?</h2>

<p>The end result is a fully automated setup with an Android app that discovers and connects with a Matter-enabled light that is able to switch the light on and off. The entire system is autonomous: everything is controlled by the regression testing script that checks that every single step in the chain works. And it does this by remotely controlling the Android app.</p>

<p>The resulting system does the following:</p>

<ul>
  <li>Builds and flashes the firmware for the two development boards</li>
  <li>Builds and installs the Android app on the Android device</li>
  <li>Does a factory reset of the lighting device, so it is ready to be re-discovered</li>
  <li>Starts a discovery over Bluetooth on the Android app</li>
  <li>Finds the lighting device</li>
  <li>Commissions the lighting device into the Thread network</li>
  <li>Turns on the light on the board from within the Android app to confirm that everything works</li>
</ul>

<p class="responsive-image-small"><img src="/adam/assets/images/agentic-coding-matter-device/photo.jpg" alt="Matter smart home setup with xG24 board as a light bulb and Android phone running the Matter control app" /></p>

<p>
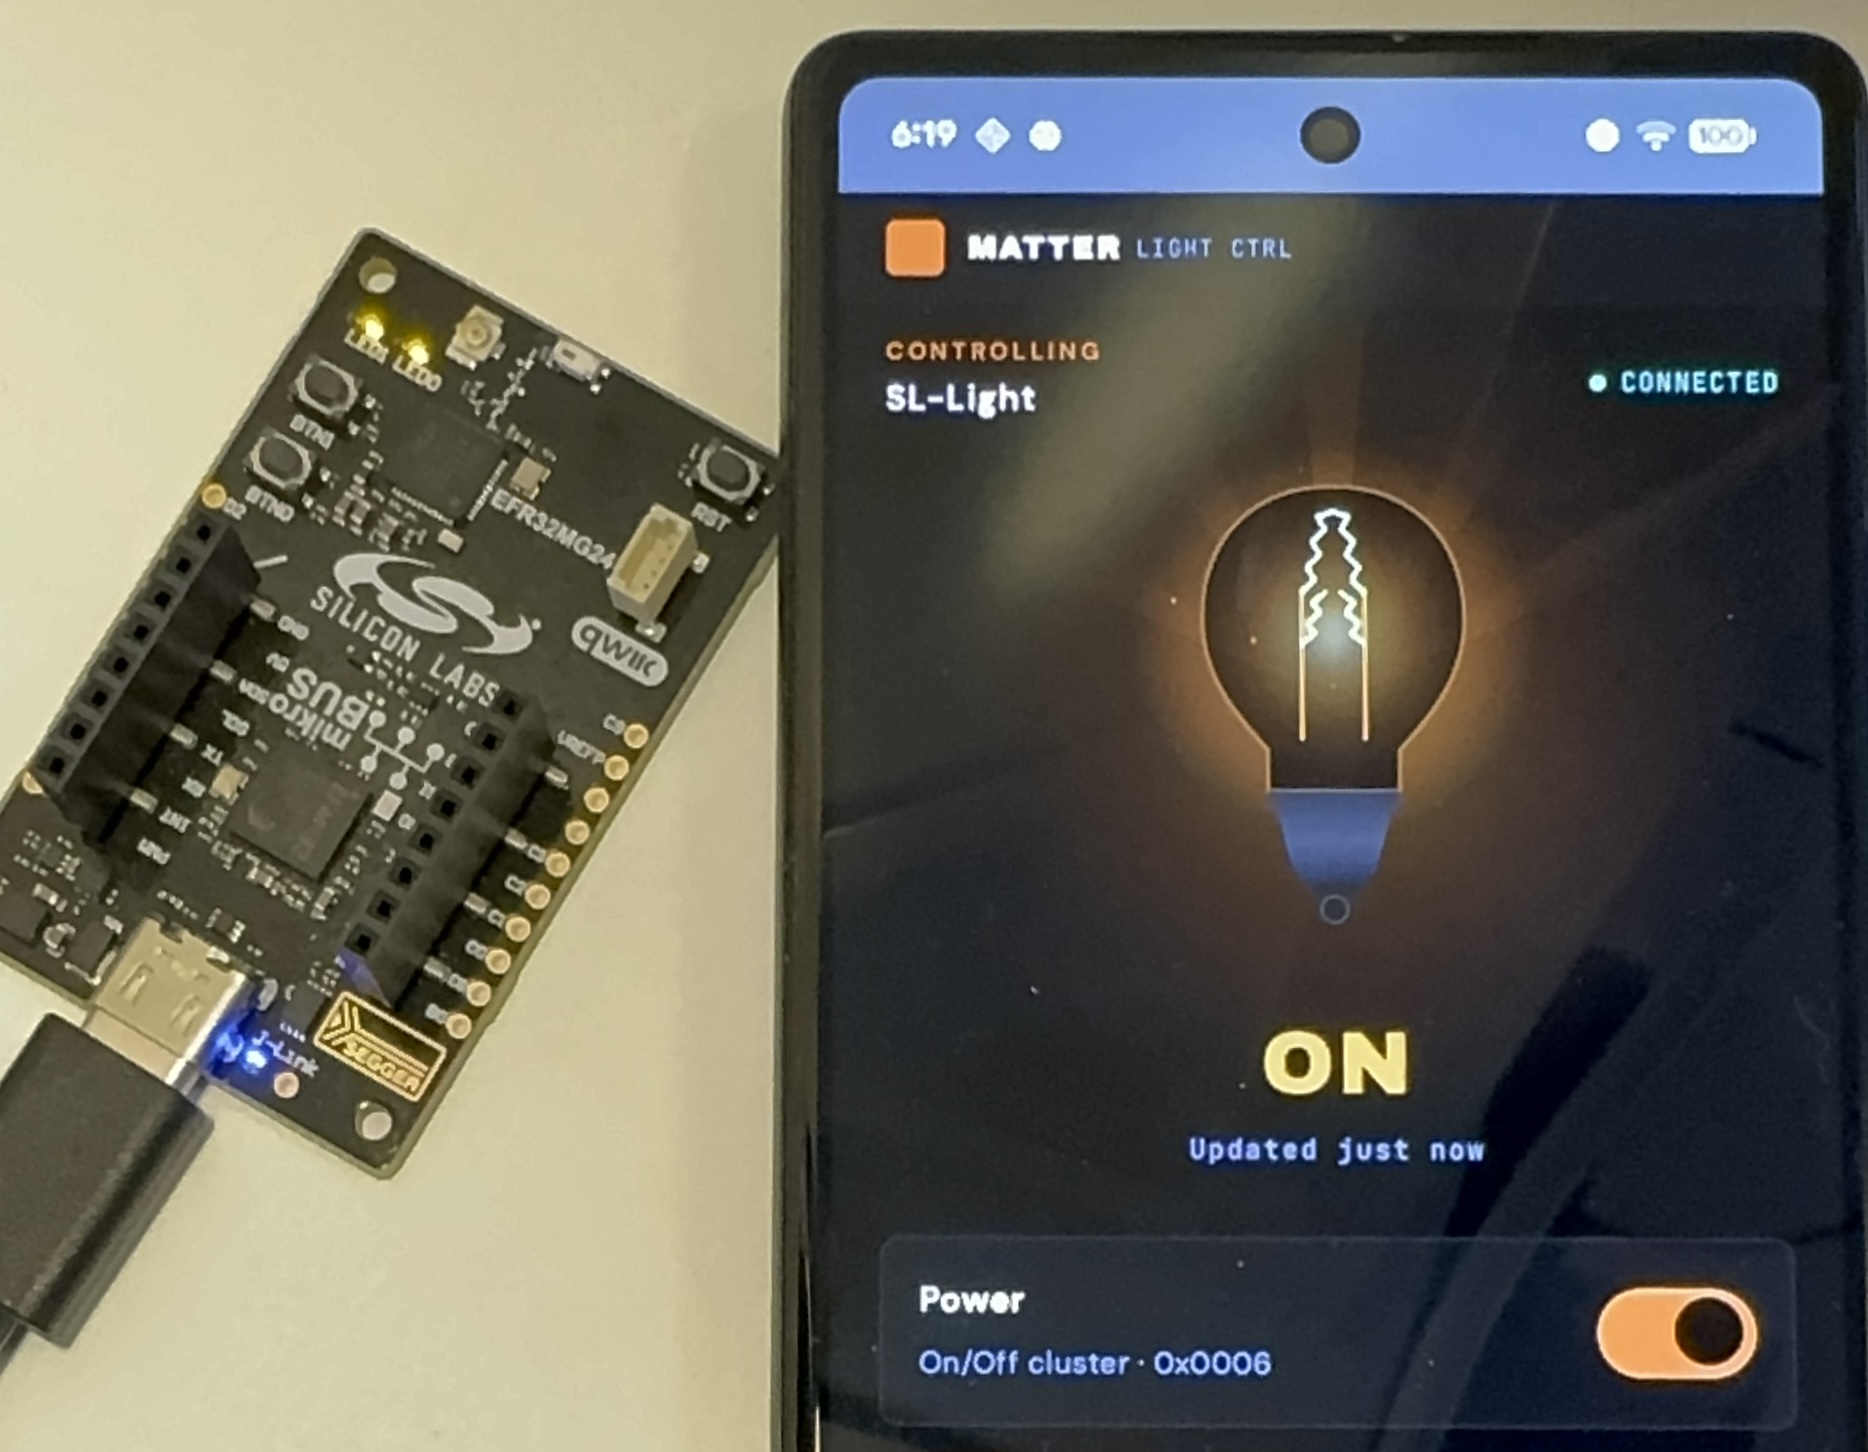
On the left we have our development board running as a Matter light bulb. On the right we have an Android phone running the app that the agents developed for us. Tapping the toggle button in the app controls the LED on the board, as if it was a real light bulb.</p>

<p>Not seen in the picture is the other development board running the Thread radio co-processor. All are connected via a USB hub to the development laptop, which is running the Matter hub inside the devcontainer.</p>

<p>The system is set up so that a script on the laptop is controlling both the Android phone and the development boards. This lets the entire system run autonomously: no human input is needed to verify that everything works as it should.</p>

<h2 id="how-much-human-input-is-needed">How Much Human Input is Needed?</h2>

<p>This project needed a significant human presence to make it work. The work had to be manually broken down into a set of individual tasks:</p>

<ul>
  <li><strong>Devcontainer</strong> – Set up a devcontainer suitable for building Matter / Thread firmware for the Silabs xG24 boards.</li>
  <li><strong>Android</strong> – Add the necessary build tools to the devcontainer for building Android apps and develop a simple Android app for Matter lighting control.</li>
  <li><strong>Commissioning flow</strong> – Develop an automated commissioning flow with the Android app, the border router, and a lighting board.</li>
  <li><strong>Debug</strong> – Debug the commissioning flow and update the Matter firmware with shell commands that allow the commissioning process to be started with no user input.</li>
  <li><strong>Visual design</strong> – Implement a new visual design for the Android app, based on user-provided design files (developed via a prompt in Claude Design)</li>
  <li><strong>Performance</strong> – Improve the performance of the commissioning flow</li>
  <li><strong>Automation</strong> – Develop a fully automated regression test for the commissioning flow</li>
</ul>

<p>Each of these steps required significant hand-holding. In particular, the commissioning flow was tricky to get right. The agents were able to figure most of it out by themselves, but they also took several wrong turns and needed to be steered in the right direction by asking them to stop and re-plan what they were working on as their context windows were filling up.</p>

<p>By far the most expensive operation was the commissioning flow debugging and performance improvement, which was mostly unattended. This was responsible for about half of the tokens spent. To debug the commissioning flow, the agents would start reading the Matter source code to figure out how the process worked. The sheer size of the codebase caused the agents to spend a lot of tokens on just reading source code. Human input was eventually required to make the agents break out of this.</p>

<p>At one point, the commissioning flow ended up having a 60 second delay from finding the device to having it commissioned and ready to accept commands. The agent that was debugging this started going deep into the Matter SDK code, which was only seen because the token count started to quickly increase. The only way to break it out of this was to tell it to stop reading SDK code, because it was using up tokens. After several wrong turns, the agent eventually started reading the documentation instead, which led to it reducing the 60 second delay to a more reasonable 4 second delay.</p>

<p class="responsive-image-small"><img src="/adam/assets/images/agentic-coding-matter-device/claude.png" alt="Claude Code token usage across the Matter smart home agentic coding project" /></p>

<p>
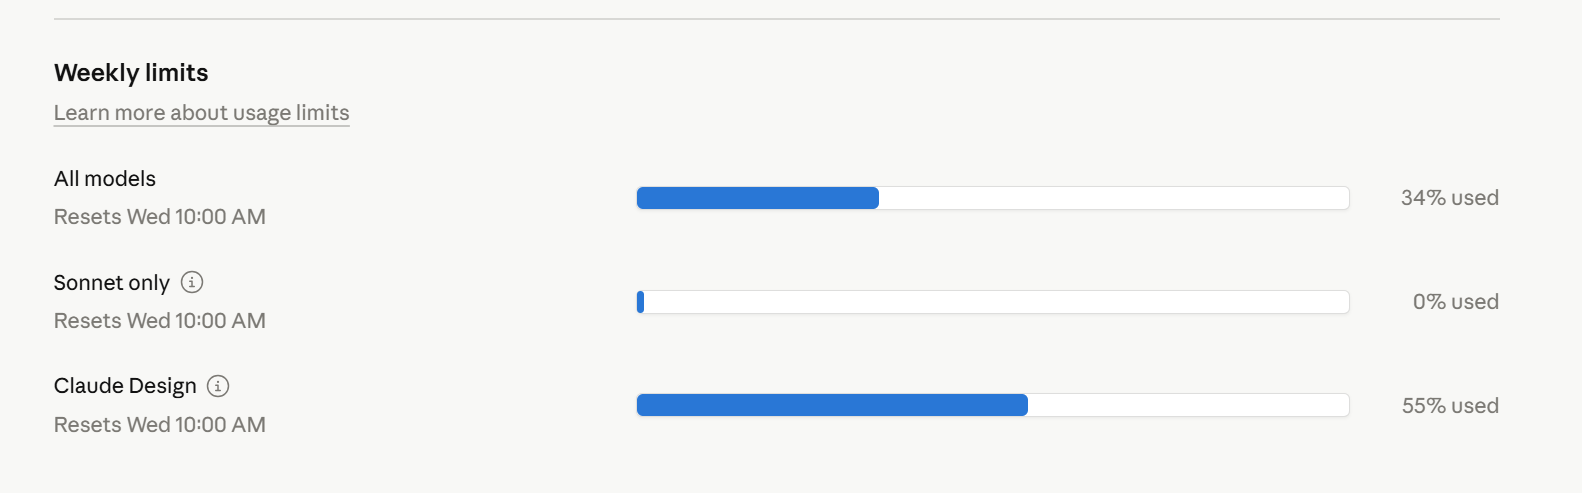
This system was built with Claude Code and its Opus 4.6 model. In total, this project used up 34% of the weekly limit on a Claude Code 5x Max subscription. This is a meaningful chunk of tokens, but not excessive for a serious agentic task. Claude Design was used to one-shot prompt the Android app design, which used 55% of the available tokens.</p>

<h2 id="can-ai-speed-up-smart-home-product-development">Can AI Speed Up Smart Home Product Development?</h2>

<p>Yes. What used to take weeks of setup now takes days. But this was far from a one-shot prompt into an AI chatbot. It required a significant understanding of the underlying technology and a lot of task planning to make it work. Setting up a development environment for a Matter smart home device, with a full commissioning flow with hardware in the loop, is a serious task, but one that is completely doable with a set of AI agents.</p>

<p>The most surprising part of this project was how well the agents debugged the IPv6 setup of the Matter flow. IPv6 is mainstream enough for the models to have it in their training set, so in a way this was expected. But the agents picked up the Matter-specific parts quickly too. Border routers, Docker network interfaces, Thread commissioning. They learned the system by reading the documentation and, sometimes, the source code.</p>

<p>The human in the loop is still doing real engineering work: breaking down tasks, catching wrong turns, understanding the system well enough to steer. The agents handle the volume. For a complex embedded project like this, that trade-off is worth it.</p>

<script type="application/ld+json">
{
  "@context": "https://schema.org",
  "@type": "FAQPage",
  "mainEntity": [
    {
      "@type": "Question",
      "name": "Can AI coding agents build a working Matter smart home device?",
      "acceptedAnswer": {
        "@type": "Answer",
        "text": "Yes, AI coding agents can build a working Matter smart home device, including embedded firmware, Thread networking, a border router, and an Android commissioning app. The project required significant human guidance to break down tasks and steer the agents, but the agents handled firmware builds, IPv6 debugging, and commissioning flow development."
      }
    },
    {
      "@type": "Question",
      "name": "How much human input do AI agents need for embedded IoT development?",
      "acceptedAnswer": {
        "@type": "Answer",
        "text": "AI agents need significant human presence for complex embedded projects. The work must be manually broken into individual tasks, and the agents require steering when they take wrong turns. The commissioning flow was especially tricky, requiring human intervention when agents spent too many tokens reading SDK source code instead of documentation."
      }
    },
    {
      "@type": "Question",
      "name": "What does it cost to use AI agents for a Matter smart home project?",
      "acceptedAnswer": {
        "@type": "Answer",
        "text": "Building a Matter smart home system with AI agents used 34% of the weekly token limit on a Claude Code 5x Max subscription. The most expensive part was debugging and performance optimization of the commissioning flow, which accounted for about half of all tokens spent."
      }
    }
  ]
}
</script>]]></content><author><name>adam</name></author><category term="IoT" /><category term="Matter" /><category term="AI" /><category term="featured" /><summary type="html"><![CDATA[AI coding agents build a working Matter smart home device with Thread networking, embedded firmware, and an Android commissioning app.]]></summary><media:thumbnail xmlns:media="http://search.yahoo.com/mrss/" url="https://dunkels.com/adam/assets/images/agentic-coding-matter-device/photo.jpg" /><media:content medium="image" url="https://dunkels.com/adam/assets/images/agentic-coding-matter-device/photo.jpg" xmlns:media="http://search.yahoo.com/mrss/" /></entry><entry><title type="html">Whose Problem Are We Solving? A Question That Cuts Through The Fog</title><link href="https://dunkels.com/adam/whose-problem-are-we-solving/" rel="alternate" type="text/html" title="Whose Problem Are We Solving? A Question That Cuts Through The Fog" /><published>2026-03-23T00:00:00+00:00</published><updated>2026-03-23T00:00:00+00:00</updated><id>https://dunkels.com/adam/whose-problem-are-we-solving</id><content type="html" xml:base="https://dunkels.com/adam/whose-problem-are-we-solving/"><![CDATA[<p>Most product ideas fail because nobody needed them in the first place. And by the time we figured that out, it may be too late.
But there is a simple question that can cut through that particular fog: <strong>Whose problem are we solving?</strong></p>

<p>Myself, I have spent both months and years building stuff nobody really needed, because we never actually answered this one question.</p>

<p>The question sounds simple. And yet I’ve found, both as a startup CEO myself and when working with companies from startups to large enterprises, that it can be hard to answer.</p>

<p>The question is really two questions in one. Are we <strong>solving a problem</strong> at all? And do we know <strong>who</strong> has this problem? Answering both gives us something valuable: not just what the problem is, but how much it matters.</p>

<h2 id="the-problem-figuring-out-the-problem">The Problem: Figuring out the Problem</h2>

<p>We all know that ideas should be formulated as solutions to real problems. Not hypothetical ones, not problems we think people <em>should</em> have, but problems that exist right now. But even when you know you <em>should</em> be thinking in terms of problems, it is easy to get lost.</p>

<p>The usual starting point is a loosely formulated idea. Myself, I’ve been in many meetings where someone (often me) proposes an idea for a product or feature with a vague justification that is some variation of “Here is an idea…” or “wouldn’t it be cool if…” And while that idea <em>may</em> have been good, there is nothing in that pitch that tells us anything about how good it really is.</p>

<p>Let’s try an example by picking a idea that kind of feels like a real product we might want to build: a Bluetooth coffee cup. A small <a href="https://en.wikipedia.org/wiki/Internet_of_things">IoT</a> sensor embedded in a coffee mug that sends a notification to your phone when the coffee hits the perfect drinking temperature. No more burnt tongue. No more cold coffee you forgot about.</p>

<p>So now we have our idea, a Bluetooth coffee cup. Applying the <strong>Whose problem are we solving?</strong> question to it:</p>

<p>But first, why isn’t it enough to just answer the question “what problem are we solving”?</p>

<h3 id="what-problem-are-we-solving-is-not-enough">“What Problem Are We Solving?” is Not Enough</h3>

<p>So we know that we are supposed to be solving a problem, and we’ve found that we can ask ourselves the question “what problem are we solving?”. This sounds great! Why isn’t this enough?</p>

<p>I’ve found that the “what problem are we solving?” question makes it too easy to simply restate our idea as a solution, without further analysis, and then believe that we’re done.</p>

<p>If our idea is the Bluetooth coffee thermometer, we might formulate the problem as: “<strong>We solve the problem of coffee being too hot to drink</strong>”. This technically answers the question of what problem we are solving. But it doesn’t tell us anything about how important that problem is.</p>

<h2 id="the-trick-focusing-on-the-who">The Trick: Focusing on the Who</h2>

<p>The <strong>“Whose problem are we solving?”</strong> question forces a shift. Instead of solely focusing on the problem we are solving, it makes us first figure out <em>who</em> has the problem we are solving.</p>

<p class="responsive-image-small"><img src="/adam/assets/images/whose-problem-are-we-solving/problem-who.png" alt="Whose problem are we solving" /></p>

<p>This really requires us to sharpen our thinking. Because if we need to find an actual person who has that problem, it isn’t enough to just say that “users” or “people” or “companies” or “multinational enterprises” has the problem.</p>

<p>We need to figure out a real person in a real role who might have the problem, like “Our customer Alice”, “Bob in accounting”, “<a href="https://en.wikipedia.org/wiki/Vice_president#In_business">VP</a>s of sales at Fortune 500 companies”, or “Python developers who want to develop frontend applications”. And this is where we start to see whether our ideas actually hold up to scrutiny.</p>

<p>Let’s look at our coffee thermometer. When we try to name someone who has this problem, and who is actively paying to solve it today, we run into trouble. Everyone who drinks coffee has experienced it being too hot. But what are they paying to solve it, today? Nothing. They wait a few minutes, or they blow on it. The existing solution is free and requires no hardware.</p>

<h2 id="how-important-is-the-problem">How Important is the Problem?</h2>

<p>Now that we know both who has the problem, and what that problem is, it is surprisingly easy to start figuring out the importance of the problem. We can do this with these three questions:</p>

<ul>
  <li><strong>How many</strong> are there that experience this problem? (Usually: the more they are, the more important the problem.)</li>
  <li><strong>How often</strong> do they experience this problem? (Usually: the more often they experience the problem, the more important it is to solve.)</li>
  <li><strong>How much</strong> are they paying today to solve this problem? (Usually: the more they are paying, the more valuable problem to solve.)</li>
</ul>

<p class="responsive-image-small"><img src="/adam/assets/images/whose-problem-are-we-solving/how.png" alt="Whose problem are we solving and how often do they experience this problem" /></p>

<p>And then we multiply them to get a rough idea of the importance: <code class="language-plaintext highlighter-rouge">How many * How often * How much</code></p>

<p>Two use cases show how this works in practice:</p>

<ul>
  <li>Building a business case</li>
  <li>Prioritizing feature requests</li>
</ul>

<h2 id="use-case-1-building-a-business-case">Use Case 1: Building a Business Case</h2>

<p>Building a business case is something we often have to do: most enterprise projects start out requiring a business case to be formulated. In a startup, the entire purpose of the company is to find a <a href="https://steveblank.com/2010/01/25/whats-a-startup-first-principles/">repeatable and scalable business</a>.</p>

<p>And our <strong>“Whose problem are we solving?”</strong> question gets to the heart of the business case. Because we can now estimate a value of the problem, and our solution to it. We do this via our three questions:</p>

<ul>
  <li>How many have this problem?</li>
  <li>How often do they have it?</li>
  <li>How much are they paying to solve it today?</li>
</ul>

<p>Then we simply compute <code class="language-plaintext highlighter-rouge">How many * How often * How much</code>, and we get a rough estimate of <a href="https://en.wikipedia.org/wiki/Total_addressable_market">the value</a>.</p>

<p>Say that 1,000 persons are paying $1,000 per day to solve this problem, our problem is worth $1,000,000 per day.</p>

<p>What if we find that only a small number of people have this problem? Or if they are not paying anything to solve it today? That means that we are in a bad place, and that we should pick a better idea. As a general rule, if we want to build a business, we probably shouldn’t solve a problem that we just found to be of low value.</p>

<p>But if we find that many people have this problem, that they have it often, and that they are paying a lot to solve it today, we have a good business case. And we now have a way to demonstrate that it is good.</p>

<h2 id="use-case-2-feature-requests">Use Case 2: Feature Requests</h2>

<p>Feature requests are another area where this question works surprisingly well. When someone has an idea for a feature, it’s easy to jump straight to building that feature. But asking <strong>“Whose problem are we solving?”</strong> first forces us to think about who really needs this feature before we start debating how to build it.</p>

<p>For feature requests, a vague answer to the question is fine. We don’t need a perfect answer, the important thing is that we think about the question. We just need enough of an answer to know whether solving it makes sense for the direction our product is heading.</p>

<p>The importance of the feature request depends on the answer to the question of whose problem it is solving. If it is solving a customer’s problem, then that usually means increases the importance of the feature request. If it is solving our own problem, that might mean that it is important too (if it is an important problem). But if we find it hard to even say whose problem this feature request really is solving, that might be an indication that this is not really an important feature request after all.</p>

<h2 id="why-this-question-works">Why this Question Works</h2>

<p>This question works because it is <a href="https://en.wikipedia.org/wiki/Falsifiability">falsifiable</a>. That means that we are able to determine if we got it right or wrong. We can talk to the people that we think have this problem to see if they actually have it. Do they have it? We might be on the right track. Do they not have it? We are probably wrong and should pick a different problem to solve.</p>

<p>Without answering this question, we can continue to believe in our idea forever, burning through runways and budgets, because we can always convince ourselves we’re making progress toward some abstract goal. Even though nobody really has the problem we think we are solving.</p>

<h2 id="more-examples">More Examples</h2>

<p>Now let’s apply this question to a few more examples. Here are some companies who are solving someones problem:</p>

<ul>
  <li>
    <p><strong>Amazon Web Services (AWS)</strong>: Whose problem are they solving? A CTO at a ten-person startup who needs to deploy a backend before launch but doesn’t want to pay for server hardware. A basic rack of servers plus colocation costs $30,000–$80,000 upfront, and $500–$2,000 a month to keep running. And this is before even writing a line of product code.</p>
  </li>
  <li>
    <p><strong>GitHub</strong>: Whose problem are they solving? A VP of Engineering whose team has grown from 5 to 25 engineers and whose codebase is starting to turn bad, with broken builds, changes overwriting each other, and a poor code review process. Enterprise version control like Perforce may cost hundreds of dollars per user per year, several thousands for a team of 25, plus a dedicated person to administer it.</p>
  </li>
  <li>
    <p><strong>Stripe</strong>: Whose problem are they solving? A CEO of a startup who needs to start charging customers before the runway runs out. A traditional merchant account costs $500–$1,000 to set up, takes weeks of paperwork, and the integration itself is another 2–4 weeks of engineering time. Maybe $15,000–$25,000 in developer hours before a single transaction clears.</p>
  </li>
  <li>
    <p><strong>Google Ads</strong>: Whose problem are they solving? A VP of Marketing at a B2B software company who may be spending $500,000 a year on trade magazine ads, conference sponsorships, and direct mail campaigns, with almost no way to know which of it is actually driving sales. A full-page trade magazine ad costs $10,000–$50,000 per insertion and reaches everyone who picks up the issue, not just the people actively searching for their product.</p>
  </li>
</ul>

<h2 id="conclusion">Conclusion</h2>

<p>It is too easy to miss good ideas and get stuck with bad ones. Figuring out whose problem our idea is solving is a simple trick to distill the good ones from the bad.</p>

<p>If we don’t know whose problem we are solving, we might burn time chasing solutions to problems that may not exist. Unlike technical debt, which can be paid down later, that time is just gone.</p>

<p>So the next time you have an idea for something (anything, really): think about whose problem it is solving.</p>]]></content><author><name>adam</name></author><category term="Startups" /><category term="Ideas" /><category term="featured" /><summary type="html"><![CDATA[Most product ideas fail because nobody needed them in the first place. And by the time we figured that out, it may be too late. But there is a simple question that can cut through that particular fog: Whose problem are we solving?]]></summary><media:thumbnail xmlns:media="http://search.yahoo.com/mrss/" url="https://dunkels.com/adam/assets/images/whose-problem-are-we-solving/problem-who.png" /><media:content medium="image" url="https://dunkels.com/adam/assets/images/whose-problem-are-we-solving/problem-who.png" xmlns:media="http://search.yahoo.com/mrss/" /></entry><entry><title type="html">Sometimes Your Device Is Alive But Is Actually Dead</title><link href="https://dunkels.com/adam/sometimes-your-device-is-alive-but-is-actually-dead/" rel="alternate" type="text/html" title="Sometimes Your Device Is Alive But Is Actually Dead" /><published>2026-02-24T00:00:00+00:00</published><updated>2026-02-24T00:00:00+00:00</updated><id>https://dunkels.com/adam/sometimes-your-device-is-alive-but-is-actually-dead</id><content type="html" xml:base="https://dunkels.com/adam/sometimes-your-device-is-alive-but-is-actually-dead/"><![CDATA[<p>A <a href="https://en.wikipedia.org/wiki/Watchdog_timer">hardware watchdog timer</a> is a standard mechanism for embedded systems.
The idea is simple: a countdown timer that resets the microcontroller unless
the firmware explicitly resets it. If the firmware gets stuck in an
infinite loop or crashes, the watchdog timer runs out and so the device reboots. And when it wakes up again, it will be <a href="https://en.wikipedia.org/wiki/Reset_(computing)">starting from a known state</a> and the device will (hopefully) work again.</p>

<p>A hardware watchdog is great, but often it by itself is not enough.</p>

<p>The problem is that the hardware watchdog only checks whether the
firmware is alive. It does not know if the firmware really is doing anything
useful. This makes it possible for IoT devices to end up in states where they are technically alive, but also dead to the outside world.</p>

<p>The solution is a multi-layered watchdog: watchdog timers at the hardware, software, and cloud levels, each checking a different aspect of the device’s health. When any layer detects a failure, the device reboots to a known state.</p>

<h2 id="what-is-a-multi-layered-watchdog">What Is a Multi-Layered Watchdog?</h2>

<p>A simple solution to this is to define software-level watchdogs that understands the semantics
of the system, at multiple levels. Both “is the CPU running?” and “has a measurement been
sent in the last hour?”, “is the wireless stack alive?” and “has
any data actually reached the cloud?”</p>

<p>We can call this structure a <strong>multi-layered watchdog</strong>:</p>

<ul>
  <li><strong>Layer 1 – Hardware watchdog</strong>: Is the CPU running?</li>
  <li><strong>Layer 2 – Software watchdogs</strong>: Is the firmware doing its job?</li>
  <li><strong>Layer 3 – Cloud watchdog</strong>: Is the system observable from the outside?</li>
</ul>

<p>Each layer catches failure modes the others cannot see. They will all react the same to failure though: just reboot the device and start from scratch. This <em>may</em> bother users, at least those who will catch the device in the act, but it will bother them significantly less than having their device appear to be dead.</p>

<p>The multi-layered watchdog is a simple design
principle: just have a watchdog at every layer of the system.</p>

<h2 id="how-do-you-define-a-liveliness-criterion">How Do You Define a Liveliness Criterion?</h2>

<p>For each watchdog layer to work, it needs a <strong>liveliness criterion</strong>: a
testable condition that defines what “alive” means at that level.
Without one, the watchdog has nothing to watch for.</p>

<p>The hardware watchdog has its liveliness criterion built in: the firmware
must kick the timer within a fixed interval. That part is simple.</p>

<p>The software watchdogs (there may be more than one) need criteria that is specific to what the system
is supposed to do. For an IoT sensor that reports temperature every 15 minutes,
a reasonable criterion might be: has a measurement been sent in the last
30 minutes? If not, something is wrong. Reboot.</p>

<p>The cloud watchdog needs a criterion from the outside looking in: has the
cloud received data from this device within the expected window? A device
that sends data every 15 minutes but has been silent for two hours has
failed its liveliness criterion, regardless of what the device itself
believes.</p>

<p>The key is to make the criterion specific enough to catch real failures, but
not so tight that normal variation in timing triggers false alarms. A device
that sends every 15 minutes should have a cloud liveliness criterion of an
hour or more – enough to tolerate a few missed transmissions without
crying wolf.</p>

<h2 id="the-cloud-watchdog">The Cloud Watchdog</h2>

<p>The cloud watchdog is special because the trigger is not happening inside the device itself. The trigger happens in the cloud, but the reboot must happen at the device.</p>

<p>The cloud checks its liveliness criterion for each device and if the device does not meet the criterion, the cloud sends a reboot command to the device. And we hope that the reboot command reaches the device.</p>

<p>The device may not know it is dead. From
its own perspective, everything is fine: the firmware is running, the
software watchdog is not detecting any issues. So while the device has no reason
to reboot, it must act on reboot commands from the cloud unconditionally, even when it believes it is
healthy.</p>

<p>It is a good idea to build in such a remote reboot command in from the start. It is easy to add when
the system is young but may be painful to retrofit once devices are in the field.</p>

<p>It is also a good idea to protect against too many or too frequent such reboots. There is also a risk that the cloud software is faulty and starts sending reboot commands, so we would like to protect against that too.</p>

<h2 id="conclusion">Conclusion</h2>

<p>A device that is alive but not useful is not a working device. Hardware watchdogs are a standard feature, but they are often not enough. Multi-layered watchdogs are a simple design principle that keeps IoT devices working even in the face of harsh conditions in the field.</p>

<script type="application/ld+json">
{
  "@context": "https://schema.org",
  "@type": "FAQPage",
  "mainEntity": [
    {
      "@type": "Question",
      "name": "What is a multi-layered watchdog for IoT devices?",
      "acceptedAnswer": {
        "@type": "Answer",
        "text": "A multi-layered watchdog is a design pattern that places watchdog timers at three levels: hardware (is the CPU running?), software (is the firmware doing its job?), and cloud (has the device reported data recently?). Each layer catches failure modes the others cannot see, and all respond to failure by rebooting the device."
      }
    },
    {
      "@type": "Question",
      "name": "Why is a hardware watchdog timer not enough for IoT devices?",
      "acceptedAnswer": {
        "@type": "Answer",
        "text": "A hardware watchdog only checks whether the firmware is running. It cannot tell if the firmware is actually doing anything useful. This means a device can be technically alive but dead to the outside world, with its wireless stack frozen or its sensors no longer reporting data."
      }
    },
    {
      "@type": "Question",
      "name": "What is a cloud watchdog and how does it work?",
      "acceptedAnswer": {
        "@type": "Answer",
        "text": "A cloud watchdog monitors whether a device has reported data within an expected time window. If the device goes silent, the cloud sends a remote reboot command. This catches failures that the device itself cannot detect, since the device may believe it is working normally while no data is reaching the cloud."
      }
    }
  ]
}
</script>]]></content><author><name>adam</name></author><category term="IoT" /><category term="Programming" /><category term="featured" /><summary type="html"><![CDATA[An IoT device can pass its hardware watchdog check while doing nothing useful. Multi-layered watchdogs catch what hardware alone cannot.]]></summary><media:thumbnail xmlns:media="http://search.yahoo.com/mrss/" url="https://dunkels.com/adam/assets/images/software-watchdog/timo-volz-mrTydVjg04o-unsplash.jpg" /><media:content medium="image" url="https://dunkels.com/adam/assets/images/software-watchdog/timo-volz-mrTydVjg04o-unsplash.jpg" xmlns:media="http://search.yahoo.com/mrss/" /></entry><entry><title type="html">Stress-Testing 100+ Bluetooth Beacons (so the Team Can Sleep Well at Night)</title><link href="https://dunkels.com/adam/stress-testing-next-generation-beacons/" rel="alternate" type="text/html" title="Stress-Testing 100+ Bluetooth Beacons (so the Team Can Sleep Well at Night)" /><published>2025-10-06T00:00:00+00:00</published><updated>2025-10-06T00:00:00+00:00</updated><id>https://dunkels.com/adam/stress-testing-next-generation-beacons</id><content type="html" xml:base="https://dunkels.com/adam/stress-testing-next-generation-beacons/"><![CDATA[<p>How do we make sure our Bluetooth beacon system works with hundreds of devices in the same room? We built a testbed with 100+ nRF52840-based beacons, stress-testing firmware, OTA updates, and backend reliability at scale so the engineering team can catch bugs before customers do.</p>

<p>Over the past year, I have been working with <a href="https://blecon.net">Blecon</a>, a startup based in Cambridge, UK, founded by the team behind the <a href="https://en.wikipedia.org/wiki/Mbed">ARM Mbed OS</a>, to make sure their new generation of Bluetooth beacons works reliably, even in the most challenging conditions.</p>

<p>Blecon is developing a new generation of Bluetooth beacons that both send and receive data and that can handle large data payloads. The beacons use nearby smartphones, in addition to dedicated gateways, to send and receive data to and from the cloud. The beacons are designed to work in environments with many devices, such as warehouses, hospitals, and smart buildings.</p>

<p>And it has to be reliable. Very reliable. So we built a testbed, with more than 100 devices, to make sure that the system works as expected.</p>

<h2 id="bluetooth-beacons-that-talk-back">Bluetooth Beacons That Talk Back</h2>

<p>Blecon has created a new class of Bluetooth beacons that, unlike old school Bluetooth beacons, can both send and receive data, and can handle much larger data payloads.</p>

<p>When a Blecon beacon is in the vicinity of a smartphone, that smartphone can forward data to and from the beacon. The data is encrypted and anonymized, so that the smartphone cannot read it. This makes it so that devices can communicate with the cloud, even when there are no dedicated gateways nearby.</p>

<p>The smartphone needs to have a Blecon-enabled app. And that’s it. Once the app is installed, everything is handled automatically by the Blecon system.</p>

<style>
#sketch-holder {
  width: 100%;
  height: 600px;
  min-height: 600px;
  max-width: 100%;
  margin: 0 auto;
  border: 1px solid #ddd;
  border-radius: 4px;
}
@media (max-width: 768px) {
  #sketch-holder {
    height: 400px;
    min-height: 400px;
  }
}
@media (max-width: 480px) {
  #sketch-holder {
    height: 300px;
    min-height: 300px;
  }
}
#sketch-holder canvas {
  max-width: 100% !important;
  height: auto !important;
}
</style>

<script src="https://cdn.jsdelivr.net/npm/p5@1.9.2/lib/p5.min.js"></script>

<script src="/adam/assets/images/stress-testing-bluetooth-beacons/sketch.js"></script>

<div id="sketch-holder"></div>

<p>The animation above shows how the system works: messages are sent to and from the beacons via the people carrying their smartphones. It is also possible to have dedicated gateway devices, called Hubs, in case there are no people around. (Feel free to click and drag around the people and the devices in the animation.)</p>

<p>Why Bluetooth? Because Bluetooth is one of the world’s most widely deployed wireless technologies. Every smartphone has Bluetooth. And the number of Bluetooth devices is growing rapidly. And workforces increasingly are equipped with phones, running apps that are easily Blecon-enabled.</p>

<p>This opens up a wide range of new applications.</p>

<p>But the system needs to be extremely reliable.</p>

<h2 id="how-do-you-test-an-iot-system-at-scale">How Do You Test an IoT System at Scale?</h2>

<p>So how do we ensure that a system like this works reliably, even when there are large numbers of devices in the same area? We can certainly use simulation to model the behavior, and this is an important part of the development process. But to understand the behavior of the system in the real world, you need to run the system with real hardware.</p>

<p>Scaling is hard. As we <a href="/adam/iot-challenges/">know from before</a>, things change dramatically when you have only 1-2 devices compared to when you have 100+ devices.</p>

<p>Robustness is the primary challenge. The system has to work, even when unexpected things happen. Given enough time, unexpected things will happen. Devices will be added and removed. Devices will run out of battery. Users will behave in unexpected ways. Interference will occur. And so on.</p>

<p>Given enough devices, even things that happen infrequently will happen regularly. To make these infrequent events happen, we need to push ourselves hard.</p>

<p>So how do we prepare for it? We set up a testbed, with actual hardware.</p>

<h2 id="we-chose-10-usb-sticks-over-something-fancier">We Chose $10 USB Sticks Over Something Fancier</h2>

<p>The hardware is both the easy part and the tricky part. It is easy in the sense of being simple: you just need to buy a bunch of devices and set them up. It is tricky in the sense of being tedious: you need to set up, run, and maintain a large number of devices.</p>

<p>Fortunately, there is one off-the-shelf hardware device that is perfect for this: the <a href="https://www.nordicsemi.com/Products/Development-hardware/nRF52840-Dongle">Nordic Semiconductor nRF52840 Dongle</a>. It is a small USB device, with a 64 MHz ARM Cortex-M4 CPU, Bluetooth 5, and a range of other features. It costs only around $10 per unit and it has a neat form factor: a thin USB stick.</p>

<p class="responsive-image-small"><img src="/adam/assets/images/stress-testing-bluetooth-beacons/nrf52840.png" alt="Nordic nRF52840 USB dongle used as a Bluetooth beacon in the testbed" /></p>

<p>The USB dongles can be easily plugged into USB hubs, to give them power, and to make them physically manegeable. We then placed the hubs on a wall, and gave them some lovely decoration in the form of IKEA shrubbery.</p>

<p class="responsive-image-small"><img src="/adam/assets/images/stress-testing-bluetooth-beacons/wall.png" alt="Wall-mounted USB hubs holding 100+ Bluetooth beacon dongles in the testbed" /></p>

<p>One drawback with these simple USB sticks is that they lack debugging ports. They’re basically only equipped with a single serial port UART over the USB connection.</p>

<p>The USB connection makes it possible to, in theory, read the debug messages that the USB dongles generate. But because USB controllers typically are not dimensioned for hundreds of devices at the same time, this becomes unreliable. So it is better to use the USB for power and use other means to get debug data from the devices.</p>

<p>Could we have chosen a more elaborate setup, with a set of debuggable devboards instead? Sure, that could have given us better insight into the behavior of each individual device. But that’s not what we’re after here: we want to see the large-scale aggregate behavior.</p>

<h2 id="the-software-that-herds-100-electronic-cats">The Software That Herds 100+ Electronic Cats</h2>

<p>The software is the heart of the system. It consists of two parts:</p>

<ul>
  <li><strong>The software under test</strong> - the beacon firmware, the smartphone apps, the cloud backend.</li>
  <li><strong>The orchestration framework</strong> - the code that manages the testbed, deploys firmware updates, runs tests, collects results.</li>
</ul>

<p>The software under test exists already, but the orchestration framework typically will be custom-made, based on the specific needs of the system under test.</p>

<p>The orchestration framework is responsible for:</p>

<ul>
  <li>Monitoring the status of all devices.</li>
  <li>Deploying firmware updates to all devices.</li>
  <li>Running tests, both continuous and periodic.</li>
  <li>Collecting and analyzing performance data.</li>
  <li>Collecting crash reports.</li>
</ul>

<p>The orchestration framework is implemented as a combination of backend scripts, cloud functions, and a web dashboard. The dashboard provides an overview of the status of the testbed, and allows the engineering team to continuously monitor performance and investigate specific issues.</p>

<p>Now let’s test it.</p>

<h3 id="step-1-can-we-break-just-one-device">Step 1: Can We Break Just One Device?</h3>

<p>The first hurdle for the software is the single-device test setup.</p>

<p>The single-device test setup is a single device, connected to a computer - in our case a Raspberry Pi. This is used for the first simple, automated tests, that are automatically run on every change to the code.</p>

<p class="responsive-image-small"><img src="/adam/assets/images/stress-testing-bluetooth-beacons/single.png" alt="Single-device Bluetooth beacon test setup with a Raspberry Pi for automated OTA testing" /></p>

<p>This is to ensure that the basic functionality of the system works, and that no obvious bugs are introduced.</p>

<p>But this is also where we need to run one important, more complex, test: can we do Over-the-Air (OTA) updates reliably? OTA updates are so important to the system that we need to see them as a fundamental part. If we cannot update the devices reliably, the system is broken. And this is something that must <em>never</em> reach the field.</p>

<p>In fact, we don’t even want this to reach the testbed, because we rely on OTA to update it.</p>

<p>To ensure that OTAs always work, for every code change, we do the following:</p>

<ul>
  <li>Build a new firmware image, and install on the device.</li>
  <li>Build <em>two</em> instances the same version of the firmware image, but with incremented version numbers, and upload to the OTA cloud.</li>
  <li>Trigger an OTA update on the device.</li>
  <li>Wait for the device to report back that the update was successful.</li>
  <li>Trigger a second OTA update.</li>
  <li>Wait for the device to report back that the second update was successful.</li>
</ul>

<p>Why do two OTAs? Because there is a risk that we have introduced a change that will make subsequent OTAs fail. For example, if we have changed the way the firmware version is stored, the second OTA might fail if it cannot determine that the new version is indeed newer than the old version. By running two OTA updates, we can catch such issues early.</p>

<h3 id="step-2-now-break-all-100-at-once">Step 2: Now Break All 100+ at Once</h3>

<p>Once the small-scale tests are working reliably, we can move on to the large-scale testbed.</p>

<p>The large-scale testbed is intended for two main purposes:</p>

<ul>
  <li>To do long-running tests, to see if it continues to work reliably, even after weeks or months of continuous operation.</li>
  <li>To test new versions of the software, to see if they hold up at scale and over time.</li>
</ul>

<p>To install a new version of the software on the testbed, we use the same OTA mechanism as in the small-scale tests. This is important, as it ensures that OTAs are tested continuously, and that any issues with OTAs are caught early.</p>

<p>OTAs need to be reliable, so as a general rule, it is a good idea for the engineering team to use it as the default way to install new firmware on the devices during development.</p>

<p>The testbed system continuously monitors the status of all devices and collects performance data. This happens all the time, even during OTAs.</p>

<p class="responsive-image-small"><img src="/adam/assets/images/stress-testing-bluetooth-beacons/metrics.png" alt="Bluetooth beacon testbed performance metrics displayed on the web dashboard" /></p>

<p>Performance data is always collected and displayed on the web frontend. The same data is also posted to a database that allow us to compare performance over time.</p>

<p>What matters most is that each device always works.</p>

<p>To ensure that every device always works, we display the status of them a screen, visible to everyone. Each device is represented by a smiley face. A happy face if things are going well, a crying face if it starting to have issues, and an angry face if it is not working at all. Thus a quick glance will be enough to get an idea of the status of the system.</p>

<p class="responsive-image-small"><img src="/adam/assets/images/stress-testing-bluetooth-beacons/screenshot.png" alt="Smileys showing the status of the testbed" /></p>

<h2 id="how-do-you-catch-iot-firmware-bugs-before-they-reach-customers">How Do You Catch IoT Firmware Bugs Before They Reach Customers?</h2>

<p>The first thing that happens when a system is exposed to large scale testing is that the bugs start to show up. Bugs are inevitable, and the more complex the system, the more bugs there will be. And they won’t show up until you run the system at scale, over time.</p>

<p>To be able to catch the bugs when they appear, it is important to have some form of crash reports built into the system. In this project, we used the <a href="https://memfault.com/">Memfault crash reporting backend</a> (now owned by Nordic Semiconductor), which turned out to be a great tool.</p>

<p>As embedded developers, we usually build some form of custom crash reporting into our systems, but this is cumbersome and takes away time that could be better spent on building the actual product. Memfault provided a great, ready-made, alternative, with a simple SDK that was easy to integrate into the existing codebase.</p>

<p>Now that we have a large-scale testbed, and the baseline system works, we can begin to provoke issues: sending too much data, too quickly, reducing the sending rate to a slow trickle, sending data when there are no smartphones around, turning on the entire system at the same time.</p>

<p>So we can, on purpose, introduce specific bugs into the system to see that it is caught before even making it into the testbed. For example, we add a bug into the OTA code by making it flip one random bit as it receives the new OTA update. Will the system catch it? Yes, it will, because it won’t even make it beyond the first one-device step.</p>

<h2 id="the-testbed-that-never-sleeps">The Testbed That Never Sleeps</h2>

<p>So now that we have made the system work reliably, should we still have the testbed set up? Yes, because the testbed now serves as a status indicator.</p>

<p class="responsive-image-small"><img src="/adam/assets/images/stress-testing-bluetooth-beacons/display.png" alt="Testbed status display showing all Bluetooth beacons healthy with smiley faces" /></p>

<p>If the testbed smileys are happy, the system is working. We can sleep well at night, knowing that the testbed is still awake.</p>

<p>If the smileys are sad, something is wrong. And if they’re angry, they’re completely offline.</p>

<p>Maybe that recent iOS update caused some unexpected behavior? Or maybe the cloud backend is having issues? The testbed will make sure we are the first to know and the engineering team can jump in and investigate.</p>

<h2 id="why-every-iot-team-needs-a-testbed">Why Every IoT Team Needs a Testbed</h2>

<p>To ensure that a complex IoT system works reliably, even in challenging environments, it is essential to test it with real hardware at scale. By setting up a testbed with hundreds of devices, we can catch issues early, ensure that critical features like OTA updates work reliably, and provide a continuous status indicator for the engineering team.</p>

<p>Also check out Blecon co-founder Donatien Garnier talking about the project at the Zephyr Developer Conference 2025:</p>

<div class="text-center">
<iframe width="560" height="315" src="https://www.youtube.com/embed/7CosvBpLebE?si=tRHt0s9537Qyv43z" title="YouTube video player" frameborder="0" allow="accelerometer; autoplay; clipboard-write; encrypted-media; gyroscope; picture-in-picture; web-share" referrerpolicy="strict-origin-when-cross-origin" allowfullscreen=""></iframe>
</div>

<p>For more insights on IoT scaling challenges, see the previous post on <a href="/adam/iot-challenges/">IoT development challenges</a>.</p>

<script type="application/ld+json">
{
  "@context": "https://schema.org",
  "@type": "FAQPage",
  "mainEntity": [
    {
      "@type": "Question",
      "name": "How do you stress-test Bluetooth beacons at scale?",
      "acceptedAnswer": {
        "@type": "Answer",
        "text": "Set up a physical testbed with 100+ Bluetooth beacon devices (such as Nordic nRF52840 dongles on USB hubs), deploy firmware via OTA updates, and run continuous automated tests. Monitor device status, collect performance metrics, and use crash reporting to catch reliability issues that only appear at scale over time."
      }
    },
    {
      "@type": "Question",
      "name": "Why do you need real hardware for IoT testing instead of simulation?",
      "acceptedAnswer": {
        "@type": "Answer",
        "text": "Simulation models behaviour but misses real-world issues like Bluetooth radio interference, USB controller limits with 100+ devices, firmware OTA edge cases, and battery behaviour. A physical testbed with real hardware surfaces bugs that only appear at scale, over time, and under conditions that are difficult to simulate accurately."
      }
    },
    {
      "@type": "Question",
      "name": "How do you ensure OTA firmware updates are reliable for IoT devices?",
      "acceptedAnswer": {
        "@type": "Answer",
        "text": "Run two consecutive OTA updates for every code change on a single-device test setup. The first update tests the basic OTA mechanism. The second catches regressions where a new firmware version breaks subsequent updates, for example by changing how version numbers are stored. Only after passing single-device OTA tests does firmware roll out to the full-scale testbed via OTA."
      }
    }
  ]
}
</script>]]></content><author><name>adam</name></author><category term="IoT" /><category term="Bluetooth" /><category term="featured" /><summary type="html"><![CDATA[We built a testbed with 100+ Bluetooth beacons on nRF52840 dongles to stress-test an IoT system at scale, catching firmware and OTA bugs before customers do.]]></summary><media:thumbnail xmlns:media="http://search.yahoo.com/mrss/" url="https://dunkels.com/adam/assets/images/stress-testing-bluetooth-beacons/testbed.png" /><media:content medium="image" url="https://dunkels.com/adam/assets/images/stress-testing-bluetooth-beacons/testbed.png" xmlns:media="http://search.yahoo.com/mrss/" /></entry><entry><title type="html">A Personal, Portable Laugh Track (A Lesson in AI Coding)</title><link href="https://dunkels.com/adam/personal-portable-laughtrack/" rel="alternate" type="text/html" title="A Personal, Portable Laugh Track (A Lesson in AI Coding)" /><published>2024-08-19T00:00:00+00:00</published><updated>2024-08-19T00:00:00+00:00</updated><id>https://dunkels.com/adam/personal-portable-laughtrack</id><content type="html" xml:base="https://dunkels.com/adam/personal-portable-laughtrack/"><![CDATA[<p>This was a ridiculous idea I had one day: wouldn’t it be fun to have a personal, portable <a href="https://tvtropes.org/pmwiki/pmwiki.php/Main/LaughTrack" target="_blank">laugh track</a> – you know, like in <a href="https://www.spokesman.com/stories/1995/apr/04/thanks-to-laugh-tracks-you-wont-chuckle-alone/" target="_blank">those old sitcoms</a> where there would be a canned laughter after every joke.</p>

<p>So I figured it would be a fun project to. This is the result:</p>

<div class="text-center"><a href="https://adamdunkels.github.io/laughtrack/app/" target="_blank" class="btn btn-dark">Online demo</a></div>

<h2 id="how-it-works">How it works</h2>

<p>The principle is simple: sample the microphone. If there is sound, wait until it gets quiet. Then play a laughter.</p>

<p>There is no further processing of the sound – and there is no AI involved. So it doesn’t matter how fun the jokes are, there will always be a laughter.</p>

<p>(In fact, sometimes there is booing instead of laughter.)</p>

<h2 id="the-code">The code</h2>

<p>The code written in JavaScript, runs directly in the browser, and is simple. It uses the Web audio API to get a buffer of sound from the microphone, then does a very simple analysis to see if there is sound or silence in the buffer.</p>

<p>First, we retrieve the audio buffer:</p>

<div class="language-plaintext highlighter-rouge"><div class="highlight"><pre class="highlight"><code>    const stream = await navigator.mediaDevices.getUserMedia({ audio: true, video: false });

    const mediastreamaudiosourcenode = audioContext().createMediaStreamSource(stream);
    const analysernode = audioContext().createAnalyser();
    mediastreamaudiosourcenode.connect(analysernode);
</code></pre></div></div>

<p>Then we do a simple amplitude summation to see if there is enough sound in the buffer:</p>

<div class="language-plaintext highlighter-rouge"><div class="highlight"><pre class="highlight"><code>    const pcmdata = new Float32Array(analysernode.fftSize);
    const onFrame = () =&gt; {
      analyserNode.getFloatTimeDomainData(pcmdata);
      let sumsquares = 0.0;
      for (const amplitude of pcmdata) {
        sumsquares += amplitude * amplitude;
      }
      let value = Math.sqrt(sumsquares / pcmdata.length);
      recentvalues.push(value);
      if (recentvalues.length &gt; 10) {
        recentvalues.shift();
      }

        if (!laughing) {
          if (value &gt; 0.005) {
            if (sounddetected === true) {
              soundend = Date.now();
            } else {
              soundstart = Date.now();
              sounddetected = true;
            }
          } else {
            if (silencedetected === false) {
              silencestart = Date.now();
              silencedetected = true;
            }
          }

          if (sounddetected &amp;&amp;
            soundend - soundstart &gt; 4 * 1000 &amp;&amp;
            silencedetected &amp;&amp;
            Date.now() - silencestart &gt; 2 * 1000) {
            sounddetected = false;
          silencedetected  = false;
          hahatime = Date.now();
          console.log('haha');
          laugh();
        }
      }
      window.requestAnimationFrame(onFrame);
    };
    window.requestAnimationFrame(onFrame);
</code></pre></div></div>

<p>To produce the laughter, we use a set of <a href="https://freesound.org/people/lonemonk/packs/4695/" target="_blank">mp3 files from freesound</a> that we post to the <code class="language-plaintext highlighter-rouge">audioContext</code> that we get from the browser environment.</p>

<div class="language-plaintext highlighter-rouge"><div class="highlight"><pre class="highlight"><code>    const source = audioContext().createBufferSource();
    let type = weightedrandom([ 1, 1, 10 ]);
    let num = Math.floor(Math.random() * laughurls[type].length);

    source.buffer = laughbuffers[type][num];
    source.connect(audioContext().destination);
    source.start();

    laughing = true;
    setTimeout(function () {
      laughing = false;
    }, source.buffer.duration * 1000);

    currentlaughtype = type;
    currentlaughnum = num;
</code></pre></div></div>

<p>We also add a bit of randomess in there, since we don’t want to repeat the same laugh too often.</p>

<p>And to spice things up a little, we add a few emojis that show the state of the laughter (if it is laughing, or booing, or not doing anything at the moment). Also, a very <a href="https://www.jsdelivr.com/package/npm/oscilloscope" target="_blank">neat oscilloscope</a> by matthiasvr allow us to see what the microphone is currently hearing.</p>

<p>Then we package it up with a neat mobile frontend from <a href="https://framework7.io/" target="_blank">framework7</a>.</p>

<h2 id="rewriting-the-code-with-chatgpt">Rewriting the code with ChatGPT</h2>

<p>I wrote the personal laughtrack code back in 2022, which was before ChatGPT was unleashed on the world. At the time, I was doing it the old way: by reading the documentation for the <a href="https://developer.mozilla.org/en-US/docs/Web/API/Web_Audio_API" target="_blank">Web audio API</a> and trying it out.</p>

<p>But in 2024, we don’t necessarily have to do it that way anymore, since we can get generative AI to help us. And ChatGPT does a pretty good job of providing a clear and simple example of how to use the Web audio API when asked:</p>

<div class="language-plaintext highlighter-rouge"><div class="highlight"><pre class="highlight"><code>// Request access to the microphone
navigator.mediaDevices.getUserMedia({ audio: true })
    .then(stream =&gt; {
        const audioContext = new (window.AudioContext || window.webkitAudioContext)();
        const microphone = audioContext.createMediaStreamSource(stream);
        const analyser = audioContext.createAnalyser();

        analyser.fftSize = 256;
        const bufferLength = analyser.frequencyBinCount;
        const dataArray = new Uint8Array(bufferLength);

        microphone.connect(analyser);

        let silenceStart = null;
        let silenceTimeout = 2000; // 2 seconds of silence
        let soundDetected = false;

        function detectSound() {
            analyser.getByteFrequencyData(dataArray);

            let sum = 0;
            for (let i = 0; i &lt; bufferLength; i++) {
                sum += dataArray[i];
            }
            const average = sum / bufferLength;

            if (average &gt; 10) { // Threshold for sound detection
                soundDetected = true;
                silenceStart = null;
            } else if (soundDetected) {
                if (silenceStart === null) {
                    silenceStart = Date.now();
                } else if (Date.now() - silenceStart &gt; silenceTimeout) {
                    playLaughSound();
                    soundDetected = false;
                    silenceStart = null;
                }
            }

            requestAnimationFrame(detectSound);
        }

        detectSound();

    })
    .catch(err =&gt; {
        console.error('Error accessing microphone: ', err);
    });

function playLaughSound() {
    const laughSound = document.getElementById('laughSound');
    laughSound.play();
}
</code></pre></div></div>

<p>In fact, the explanation provided by ChatGPT is better than the explanation that I have given here.</p>

<h2 id="conclusions">Conclusions</h2>

<p>I recently rediscovered this little project I did back in 2022 and thought it would be fun to review it today, in light of how generative AI has changed how we prototype ideas. If I had done this little project today, I would most certainly have been helped by ChatGPT (or similar generative AI tools).</p>

<p>In any case, the portable laugh track is in itself a pretty fun thing to play around with for a while, even though it quickly can become somewhat annoying.</p>]]></content><author><name>adam</name></author><category term="Programming" /><category term="Just for Fun" /><summary type="html"><![CDATA[This was a ridiculous idea I had one day: wouldn’t it be fun to have a personal, portable laugh track – you know, like in those old sitcoms where there would be a canned laughter after every joke. So I figured it would be a fun project to. This is the result: Online demo How it works The principle is simple: sample the microphone. If there is sound, wait until it gets quiet. Then play a laughter. There is no further processing of the sound – and there is no AI involved. So it doesn’t matter how fun the jokes are, there will always be a laughter. (In fact, sometimes there is booing instead of laughter.) The code The code written in JavaScript, runs directly in the browser, and is simple. It uses the Web audio API to get a buffer of sound from the microphone, then does a very simple analysis to see if there is sound or silence in the buffer. First, we retrieve the audio buffer: const stream = await navigator.mediaDevices.getUserMedia({ audio: true, video: false }); const mediastreamaudiosourcenode = audioContext().createMediaStreamSource(stream); const analysernode = audioContext().createAnalyser(); mediastreamaudiosourcenode.connect(analysernode); Then we do a simple amplitude summation to see if there is enough sound in the buffer: const pcmdata = new Float32Array(analysernode.fftSize); const onFrame = () =&gt; { analyserNode.getFloatTimeDomainData(pcmdata); let sumsquares = 0.0; for (const amplitude of pcmdata) { sumsquares += amplitude * amplitude; } let value = Math.sqrt(sumsquares / pcmdata.length); recentvalues.push(value); if (recentvalues.length &gt; 10) { recentvalues.shift(); } if (!laughing) { if (value &gt; 0.005) { if (sounddetected === true) { soundend = Date.now(); } else { soundstart = Date.now(); sounddetected = true; } } else { if (silencedetected === false) { silencestart = Date.now(); silencedetected = true; } } if (sounddetected &amp;&amp; soundend - soundstart &gt; 4 * 1000 &amp;&amp; silencedetected &amp;&amp; Date.now() - silencestart &gt; 2 * 1000) { sounddetected = false; silencedetected = false; hahatime = Date.now(); console.log('haha'); laugh(); } } window.requestAnimationFrame(onFrame); }; window.requestAnimationFrame(onFrame); To produce the laughter, we use a set of mp3 files from freesound that we post to the audioContext that we get from the browser environment. const source = audioContext().createBufferSource(); let type = weightedrandom([ 1, 1, 10 ]); let num = Math.floor(Math.random() * laughurls[type].length); source.buffer = laughbuffers[type][num]; source.connect(audioContext().destination); source.start(); laughing = true; setTimeout(function () { laughing = false; }, source.buffer.duration * 1000); currentlaughtype = type; currentlaughnum = num; We also add a bit of randomess in there, since we don’t want to repeat the same laugh too often. And to spice things up a little, we add a few emojis that show the state of the laughter (if it is laughing, or booing, or not doing anything at the moment). Also, a very neat oscilloscope by matthiasvr allow us to see what the microphone is currently hearing. Then we package it up with a neat mobile frontend from framework7. Rewriting the code with ChatGPT I wrote the personal laughtrack code back in 2022, which was before ChatGPT was unleashed on the world. At the time, I was doing it the old way: by reading the documentation for the Web audio API and trying it out. But in 2024, we don’t necessarily have to do it that way anymore, since we can get generative AI to help us. And ChatGPT does a pretty good job of providing a clear and simple example of how to use the Web audio API when asked: // Request access to the microphone navigator.mediaDevices.getUserMedia({ audio: true }) .then(stream =&gt; { const audioContext = new (window.AudioContext || window.webkitAudioContext)(); const microphone = audioContext.createMediaStreamSource(stream); const analyser = audioContext.createAnalyser(); analyser.fftSize = 256; const bufferLength = analyser.frequencyBinCount; const dataArray = new Uint8Array(bufferLength); microphone.connect(analyser); let silenceStart = null; let silenceTimeout = 2000; // 2 seconds of silence let soundDetected = false; function detectSound() { analyser.getByteFrequencyData(dataArray); let sum = 0; for (let i = 0; i &lt; bufferLength; i++) { sum += dataArray[i]; } const average = sum / bufferLength; if (average &gt; 10) { // Threshold for sound detection soundDetected = true; silenceStart = null; } else if (soundDetected) { if (silenceStart === null) { silenceStart = Date.now(); } else if (Date.now() - silenceStart &gt; silenceTimeout) { playLaughSound(); soundDetected = false; silenceStart = null; } } requestAnimationFrame(detectSound); } detectSound(); }) .catch(err =&gt; { console.error('Error accessing microphone: ', err); }); function playLaughSound() { const laughSound = document.getElementById('laughSound'); laughSound.play(); } In fact, the explanation provided by ChatGPT is better than the explanation that I have given here. Conclusions I recently rediscovered this little project I did back in 2022 and thought it would be fun to review it today, in light of how generative AI has changed how we prototype ideas. If I had done this little project today, I would most certainly have been helped by ChatGPT (or similar generative AI tools). In any case, the portable laugh track is in itself a pretty fun thing to play around with for a while, even though it quickly can become somewhat annoying.]]></summary><media:thumbnail xmlns:media="http://search.yahoo.com/mrss/" url="https://dunkels.com/adam/assets/images/laughtrack/audience_laughing.jpg" /><media:content medium="image" url="https://dunkels.com/adam/assets/images/laughtrack/audience_laughing.jpg" xmlns:media="http://search.yahoo.com/mrss/" /></entry><entry><title type="html">How to Use git diff with an sqlite3 Database</title><link href="https://dunkels.com/adam/git-diff-sqlite3/" rel="alternate" type="text/html" title="How to Use git diff with an sqlite3 Database" /><published>2024-07-11T00:00:00+00:00</published><updated>2024-07-11T00:00:00+00:00</updated><id>https://dunkels.com/adam/git-diff-sqlite3</id><content type="html" xml:base="https://dunkels.com/adam/git-diff-sqlite3/"><![CDATA[<p>If we have a git repository where there is a binary sqlite3 file, it is difficult to see what changed by only using a <code class="language-plaintext highlighter-rouge">git diff</code> command. But there is a neat git trick (learned from <a href="https://ongardie.net/blog/sqlite-in-git/]">here</a>) we can use to overcome this: we use git’s built-in textconv mechanism to dump the sqlite3 database on-the-fly so that we can use the standard <code class="language-plaintext highlighter-rouge">git diff</code> to see the changes.</p>

<h2 id="the-problem-an-sqlite3-database-is-a-binary-file">The Problem: an sqlite3 Database is a Binary File</h2>

<p><a href="https://www.sqlite.org/">sqlite3</a> is a small but powerful database that, unlike its more powerful counterparts like MySQL and PostgreSQL, stores its data in a single binary file. And just like its more powerful counterparts, we can use the Structured Query Language (SQL) to query the database.</p>

<p>There are times that an sqlite3 database file is committed to a git repository. For example, a customer was using an internal tool that stored a small user database in a sqlite3 database file. This file was committed to the repo because it was a good place to keep it. This worked great when only a single developer was working on the database, but started getting tricky once more than that single developer was operating on the file.</p>

<p>Normally, git is really good at figuring out and displaying what changed in a file, but only for text files – not for binary files. And sqlite3 files are indeed binary files. So in this particular case, it became more and more difficult to handle changes that were done to this database.</p>

<p>But there is a neat little trick we can use to convert them to text files on-the-fly.</p>

<h2 id="the-trick-dump-the-sqlite3-database-on-the-fly">The Trick: Dump the sqlite3 Database on-the-fly</h2>

<p>The trick is rather simple: git has <a href="https://git-scm.com/docs/gitattributes">built-in mechanisms</a> to convert binary files into a format that can be used for diffing and patching. If we set them up correctly, we can use <code class="language-plaintext highlighter-rouge">git diff</code> and <code class="language-plaintext highlighter-rouge">git log -p</code> and other niceties to see exactly what changed inside those binary sqlite3 files!</p>

<p>Here’s how:</p>

<p>We need to define a custom diff mechanism, which we simply call <code class="language-plaintext highlighter-rouge">sqlite3</code>. We do this by issuing this <code class="language-plaintext highlighter-rouge">git config</code> command:</p>

<div class="language-plaintext highlighter-rouge"><div class="highlight"><pre class="highlight"><code>git config diff.sqlite3.textconv "sh -c 'sqlite3 \$0 .dump'"
</code></pre></div></div>

<p>This will create an entry in our repository’s <code class="language-plaintext highlighter-rouge">.gitconfig</code> file. If we want, we can also set this configuration for all repositories, like this:</p>

<div class="language-plaintext highlighter-rouge"><div class="highlight"><pre class="highlight"><code>git config --global diff.sqlite3.textconv "sh -c 'sqlite3 \$0 .dump'"
</code></pre></div></div>

<p>This will instruct <code class="language-plaintext highlighter-rouge">git diff</code> to pipe its files through the <code class="language-plaintext highlighter-rouge">sqlite3</code> command and its <code class="language-plaintext highlighter-rouge">.dump</code> operation, which simply dumps its entire database as a big SQL statement. The output if this operation is then used as input to the normal <code class="language-plaintext highlighter-rouge">git diff</code> mechanism.</p>

<p>If we look into our <code class="language-plaintext highlighter-rouge">.git/config</code> file we should now see something like these lines in there:</p>

<div class="language-plaintext highlighter-rouge"><div class="highlight"><pre class="highlight"><code>[diff "sqlite3"]
    textconv = sh -c 'sqlite3 $0 .dump'
</code></pre></div></div>

<p>Those two lines were added when we ran the <code class="language-plaintext highlighter-rouge">git config</code> command above.</p>

<p>Next, we need to tell git that we want to use this diff mechanism for sqlite3 files. There is no prescribed extension for sqlite3 files, but <code class="language-plaintext highlighter-rouge">.sqlite3</code> is a common one, so let’s use that. We should add the following line to our <code class="language-plaintext highlighter-rouge">.gitattributes</code> file for our repository:</p>

<div class="language-plaintext highlighter-rouge"><div class="highlight"><pre class="highlight"><code>*.sqlite3 diff=sqlite3
</code></pre></div></div>

<p>This tells the <code class="language-plaintext highlighter-rouge">git</code> command that it should use our newly defined <code class="language-plaintext highlighter-rouge">sqlite3</code> diff mechanism for all files that match the <code class="language-plaintext highlighter-rouge">*.sqlite3</code> pattern.</p>

<p>And that’s it! Let’s look at an example.</p>

<h2 id="an-entire-example">An Entire Example</h2>

<p>We start by creating a new directory and an empty git repository:</p>

<div class="language-plaintext highlighter-rouge"><div class="highlight"><pre class="highlight"><code>mkdir new-directory
cd new-directory
git init
</code></pre></div></div>

<p>And we configure it with the mechanism from above:</p>

<div class="language-plaintext highlighter-rouge"><div class="highlight"><pre class="highlight"><code>git config diff.sqlite3.textconv "sh -c 'sqlite3 \$0 .dump'"
echo '*.sqlite3 diff=sqlite3' &gt; .gitattributes
</code></pre></div></div>

<p>Next we create an sqlite3 database. We do this using the <code class="language-plaintext highlighter-rouge">sqlite3</code> command line tool and its interactive mode:</p>

<div class="language-plaintext highlighter-rouge"><div class="highlight"><pre class="highlight"><code>sqlite3 database.sqlite3
</code></pre></div></div>

<p>We are now in interactive mode so let’s create a small database:</p>

<div class="language-plaintext highlighter-rouge"><div class="highlight"><pre class="highlight"><code>CREATE TABLE users (
    id INTEGER PRIMARY KEY,
    name TEXT NOT NULL,
    email TEXT NOT NULL
);
</code></pre></div></div>

<p>And, while still in interactive mode, we add some users into our database:</p>

<div class="language-plaintext highlighter-rouge"><div class="highlight"><pre class="highlight"><code>INSERT INTO users (name, email) VALUES ('Alice', 'alice@example.com');
INSERT INTO users (name, email) VALUES ('Bob', 'bob@example.com');
</code></pre></div></div>

<p>We can now use the <code class="language-plaintext highlighter-rouge">SELECT</code> statement to see that they are there:</p>

<div class="language-plaintext highlighter-rouge"><div class="highlight"><pre class="highlight"><code>SELECT * FROM users;
</code></pre></div></div>

<p>Which should give us the output:</p>

<div class="language-plaintext highlighter-rouge"><div class="highlight"><pre class="highlight"><code>1|Alice|alice@example.com
2|Bob|bob@example.com
</code></pre></div></div>

<p>We exit the interactive sqlite3 mode with:</p>

<div class="language-plaintext highlighter-rouge"><div class="highlight"><pre class="highlight"><code>.exit
</code></pre></div></div>

<p>Now we can commit our new database to our git repository:</p>

<div class="language-plaintext highlighter-rouge"><div class="highlight"><pre class="highlight"><code>git add database.sqlite3
git commit -m "A new database"
</code></pre></div></div>

<p>Now we have a git repository with a binary file that contains our small database. Let’s add another user and see what happens when we run <code class="language-plaintext highlighter-rouge">git diff</code> on our repo.</p>

<p>We enter interactive mode again:</p>

<div class="language-plaintext highlighter-rouge"><div class="highlight"><pre class="highlight"><code>sqlite3 database.sqlite3
</code></pre></div></div>

<p>And run:</p>

<div class="language-plaintext highlighter-rouge"><div class="highlight"><pre class="highlight"><code>INSERT INTO users (name, email) VALUES ('Charlie', 'charlie@example.com');
</code></pre></div></div>

<p>We then exit interactive mode:</p>

<div class="language-plaintext highlighter-rouge"><div class="highlight"><pre class="highlight"><code>.exit
</code></pre></div></div>
<p>Now let’s see if we can do a git diff:</p>

<div class="language-plaintext highlighter-rouge"><div class="highlight"><pre class="highlight"><code>$ git diff
diff --git a/database.sqlite3 b/database.sqlite3
index f56ddeb..6b1cfe5 100644
--- a/database.sqlite3
+++ b/database.sqlite3
@@ -7,4 +7,5 @@ CREATE TABLE users (
 );
 INSERT INTO users VALUES(1,'Alice','alice@example.com');
 INSERT INTO users VALUES(2,'Bob','bob@example.com');
+INSERT INTO users VALUES(3,'Charlie','charlie@example.com');
 COMMIT;
</code></pre></div></div>

<p>Oh look! We see that there is a new user entered into our database – just what we would like to see.</p>

<p>If we commit this change to the git repo, we can even use <code class="language-plaintext highlighter-rouge">git log -p</code> to see exactly what changed between revisions. Note that we can’t use <code class="language-plaintext highlighter-rouge">git add -p</code> to add our changes: git will complain about how only a binary file changed. But this is probably for the best, as we wouldn’t want to commit partial diffs in a situation like this anyway.</p>

<h2 id="conclusions">Conclusions</h2>

<p>sqlite3 is a powerful and handy database that people use for a lot of different things. While committing sqlite3 files to a git repo may not always be the recommended way to work, it is something that happens from time to time. The trick presented here is a neat way to deal with the situation, in case it happens.</p>]]></content><author><name>adam</name></author><category term="Programming" /><summary type="html"><![CDATA[If we have a git repository where there is a binary sqlite3 file, it is difficult to see what changed by only using a git diff command. But there is a neat git trick (learned from here) we can use to overcome this: we use git’s built-in textconv mechanism to dump the sqlite3 database on-the-fly so that we can use the standard git diff to see the changes. The Problem: an sqlite3 Database is a Binary File sqlite3 is a small but powerful database that, unlike its more powerful counterparts like MySQL and PostgreSQL, stores its data in a single binary file. And just like its more powerful counterparts, we can use the Structured Query Language (SQL) to query the database. There are times that an sqlite3 database file is committed to a git repository. For example, a customer was using an internal tool that stored a small user database in a sqlite3 database file. This file was committed to the repo because it was a good place to keep it. This worked great when only a single developer was working on the database, but started getting tricky once more than that single developer was operating on the file. Normally, git is really good at figuring out and displaying what changed in a file, but only for text files – not for binary files. And sqlite3 files are indeed binary files. So in this particular case, it became more and more difficult to handle changes that were done to this database. But there is a neat little trick we can use to convert them to text files on-the-fly. The Trick: Dump the sqlite3 Database on-the-fly The trick is rather simple: git has built-in mechanisms to convert binary files into a format that can be used for diffing and patching. If we set them up correctly, we can use git diff and git log -p and other niceties to see exactly what changed inside those binary sqlite3 files! Here’s how: We need to define a custom diff mechanism, which we simply call sqlite3. We do this by issuing this git config command: git config diff.sqlite3.textconv "sh -c 'sqlite3 \$0 .dump'" This will create an entry in our repository’s .gitconfig file. If we want, we can also set this configuration for all repositories, like this: git config --global diff.sqlite3.textconv "sh -c 'sqlite3 \$0 .dump'" This will instruct git diff to pipe its files through the sqlite3 command and its .dump operation, which simply dumps its entire database as a big SQL statement. The output if this operation is then used as input to the normal git diff mechanism. If we look into our .git/config file we should now see something like these lines in there: [diff "sqlite3"] textconv = sh -c 'sqlite3 $0 .dump' Those two lines were added when we ran the git config command above. Next, we need to tell git that we want to use this diff mechanism for sqlite3 files. There is no prescribed extension for sqlite3 files, but .sqlite3 is a common one, so let’s use that. We should add the following line to our .gitattributes file for our repository: *.sqlite3 diff=sqlite3 This tells the git command that it should use our newly defined sqlite3 diff mechanism for all files that match the *.sqlite3 pattern. And that’s it! Let’s look at an example. An Entire Example We start by creating a new directory and an empty git repository: mkdir new-directory cd new-directory git init And we configure it with the mechanism from above: git config diff.sqlite3.textconv "sh -c 'sqlite3 \$0 .dump'" echo '*.sqlite3 diff=sqlite3' &gt; .gitattributes Next we create an sqlite3 database. We do this using the sqlite3 command line tool and its interactive mode: sqlite3 database.sqlite3 We are now in interactive mode so let’s create a small database: CREATE TABLE users ( id INTEGER PRIMARY KEY, name TEXT NOT NULL, email TEXT NOT NULL ); And, while still in interactive mode, we add some users into our database: INSERT INTO users (name, email) VALUES ('Alice', 'alice@example.com'); INSERT INTO users (name, email) VALUES ('Bob', 'bob@example.com'); We can now use the SELECT statement to see that they are there: SELECT * FROM users; Which should give us the output: 1|Alice|alice@example.com 2|Bob|bob@example.com We exit the interactive sqlite3 mode with: .exit Now we can commit our new database to our git repository: git add database.sqlite3 git commit -m "A new database" Now we have a git repository with a binary file that contains our small database. Let’s add another user and see what happens when we run git diff on our repo. We enter interactive mode again: sqlite3 database.sqlite3 And run: INSERT INTO users (name, email) VALUES ('Charlie', 'charlie@example.com'); We then exit interactive mode: .exit Now let’s see if we can do a git diff: $ git diff diff --git a/database.sqlite3 b/database.sqlite3 index f56ddeb..6b1cfe5 100644 --- a/database.sqlite3 +++ b/database.sqlite3 @@ -7,4 +7,5 @@ CREATE TABLE users ( ); INSERT INTO users VALUES(1,'Alice','alice@example.com'); INSERT INTO users VALUES(2,'Bob','bob@example.com'); +INSERT INTO users VALUES(3,'Charlie','charlie@example.com'); COMMIT; Oh look! We see that there is a new user entered into our database – just what we would like to see. If we commit this change to the git repo, we can even use git log -p to see exactly what changed between revisions. Note that we can’t use git add -p to add our changes: git will complain about how only a binary file changed. But this is probably for the best, as we wouldn’t want to commit partial diffs in a situation like this anyway. Conclusions sqlite3 is a powerful and handy database that people use for a lot of different things. While committing sqlite3 files to a git repo may not always be the recommended way to work, it is something that happens from time to time. The trick presented here is a neat way to deal with the situation, in case it happens.]]></summary><media:thumbnail xmlns:media="http://search.yahoo.com/mrss/" url="https://dunkels.com/adam/assets/images/git-diff-sqlite3/SQLite370.png" /><media:content medium="image" url="https://dunkels.com/adam/assets/images/git-diff-sqlite3/SQLite370.png" xmlns:media="http://search.yahoo.com/mrss/" /></entry><entry><title type="html">How to Build a Profitable IoT Product</title><link href="https://dunkels.com/adam/how-to-build-a-profitable-iot-product/" rel="alternate" type="text/html" title="How to Build a Profitable IoT Product" /><published>2024-03-30T00:00:00+00:00</published><updated>2024-03-30T00:00:00+00:00</updated><id>https://dunkels.com/adam/how-to-build-a-profitable-iot-product</id><content type="html" xml:base="https://dunkels.com/adam/how-to-build-a-profitable-iot-product/"><![CDATA[<p>The slides from my talk at the March 2024 IoT meetup in Stockholm, Sweden. I don’t think the talk was streamed or recorded.</p>

<iframe src="https://www.slideshare.net/slideshow/embed_code/key/JrzbvQLhuvDyv2?hostedIn=slideshare&amp;page=upload" width="476" height="400" frameborder="0" marginwidth="0" marginheight="0" scrolling="no"></iframe>]]></content><author><name>adam</name></author><category term="Ideas" /><category term="Startups" /><category term="IoT" /><summary type="html"><![CDATA[The slides from my talk at the March 2024 IoT meetup in Stockholm, Sweden. I don’t think the talk was streamed or recorded.]]></summary><media:thumbnail xmlns:media="http://search.yahoo.com/mrss/" url="https://dunkels.com/adam/assets/images/how-to-build-a-profitable-iot-product/title-slide.png" /><media:content medium="image" url="https://dunkels.com/adam/assets/images/how-to-build-a-profitable-iot-product/title-slide.png" xmlns:media="http://search.yahoo.com/mrss/" /></entry><entry><title type="html">Video: Don’t Wait for the IoT Standard</title><link href="https://dunkels.com/adam/dont-wait-for-the-iot-standard/" rel="alternate" type="text/html" title="Video: Don’t Wait for the IoT Standard" /><published>2024-02-01T00:00:00+00:00</published><updated>2024-02-01T00:00:00+00:00</updated><id>https://dunkels.com/adam/dont-wait-for-the-iot-standard</id><content type="html" xml:base="https://dunkels.com/adam/dont-wait-for-the-iot-standard/"><![CDATA[<iframe width="560" height="315" src="https://www.youtube.com/embed/W5JscBuQhdE?si=RRpE_C2u_HQB7qj8" title="YouTube video player" frameborder="0" allow="accelerometer; autoplay; clipboard-write; encrypted-media; gyroscope; picture-in-picture; web-share" referrerpolicy="strict-origin-when-cross-origin" allowfullscreen=""></iframe>

<p>My talk from the Emerging Tech Beat conference from 2020, so a few years old by now, and the sound has problems during the first few minutes, but interesting to see what has changed, and what hasn’t, over the past few years.</p>]]></content><author><name>adam</name></author><category term="Ideas" /><category term="IoT" /><summary type="html"><![CDATA[My talk from the Emerging Tech Beat conference from 2020, so a few years old by now, and the sound has problems during the first few minutes, but interesting to see what has changed, and what hasn’t, over the past few years.]]></summary><media:thumbnail xmlns:media="http://search.yahoo.com/mrss/" url="https://dunkels.com/adam/assets/images/dont-wait-for-the-iot-standard/thumbnail.png" /><media:content medium="image" url="https://dunkels.com/adam/assets/images/dont-wait-for-the-iot-standard/thumbnail.png" xmlns:media="http://search.yahoo.com/mrss/" /></entry><entry><title type="html">A Simple Way to Pitch Ideas</title><link href="https://dunkels.com/adam/procosoco-pitch-ideas/" rel="alternate" type="text/html" title="A Simple Way to Pitch Ideas" /><published>2023-05-01T00:00:00+00:00</published><updated>2023-05-01T00:00:00+00:00</updated><id>https://dunkels.com/adam/procosoco-pitch-ideas</id><content type="html" xml:base="https://dunkels.com/adam/procosoco-pitch-ideas/"><![CDATA[<p>Pitching ideas is hard. This makes ideas die too early – even brilliant ones. </p>

<p>Here is a simple way to pitch ideas, which I have chosen to call “Procosoco” despite it being a somewhat silly name. It makes your ideas easier to understand – and, as a bonus, improves the quality of the ideas.</p>

<p>The technique is simple. Just describe your idea using four sentences:</p>

<ol>
  <li>State the problem</li>
  <li>Describe the consequences of the problem</li>
  <li>State the solution</li>
  <li>Describe the consequences of the solution</li>
</ol>

<p>And that’s it! The trick is simply to structure your idea into these four sentences.</p>

<p>Let’s look at a few examples:</p>

<h4 id="example-lunch">Example: Lunch</h4>

<ol>
  <li>We are hungry.</li>
  <li>This makes us grumpy and unproductive.</li>
  <li>Let’s go to lunch.</li>
  <li>When we’re back, we’ll be happy and productive again.</li>
</ol>

<h4 id="example-a-new-ai-model">Example: A new AI model</h4>

<ol>
  <li>Today’s AI models are extremely expensive to train and run.</li>
  <li>This makes generative AI available only to a few large corporations.</li>
  <li>We present SlideRuleGPT, a new AI model that can be run on a single <a href="https://en.wikipedia.org/wiki/Slide_rule" target="_blank">slide rule</a></li>
  <li>This makes generative AI available to anyone, even without Internet access.</li>
</ol>

<h4 id="example-a-new-ai-startup">Example: A new AI startup</h4>

<ol>
  <li>Project managers find it difficult to identify and recruit the right people to work on new projects.</li>
  <li>This leads to projects being delayed or fail.</li>
  <li>We provide an AI bot that reads the project plans and identifies the perfect people for each project.</li>
  <li>This makes projects complete faster and with better results.</li>
</ol>

<p>So the general structure is this:</p>
<ul>
  <li>Problem</li>
  <li>Consequence</li>
  <li>Solution</li>
  <li>Consequence</li>
</ul>

<p>I’d like to call this technique <code class="language-plaintext highlighter-rouge">Procosoco</code>, which simply is a contraction of “<strong>pro</strong>blem / <strong>co</strong>nsequence / <strong>so</strong>lution / <strong>co</strong>nsequence”.</p>

<p>The origin for this technique is a brief comment by <a href="https://en.wikipedia.org/wiki/Kent_Beck" target="_blank">Kent Beck</a> on how to write effective abstracts for research papers. The comment appears in a post from 1993 titled <a href="https://plg.uwaterloo.ca/~migod/research/beckOOPSLA.html" target="_blank">“How to get a paper accepted at OOPSLA”</a>. The comment is:</p>

<blockquote>
  <p>I try to have four sentences in my abstract. The first states the problem. The second states why the problem is a problem. The third is my startling sentence. The fourth states the implication of my startling sentence.</p>
</blockquote>

<p>I read this some 20+ years ago, and have since found this technique useful not only for writing research abstracts, but as a general tool for conveying ideas.</p>

<p>The technique can also be used to help development and testing of ideas. If it is difficult to express your idea with this four-sentence structure, that is an indication that the idea needs more work.</p>

<p>Is it difficult to express what problem your idea is solving? Others will feel it equally difficult to understand what problem is being solved and they won’t see how it could help them. So you need to work more on the defining the problem.</p>

<p>Is it difficult to express the consequences of your solution? Then others may reject your idea since they don’t understand how it will make their life better. Then work more on your solution – or maybe try a different solution?</p>

<p>Let’s look at a few use cases.</p>

<h2 id="use-case-writing-papers">Use Case: Writing Papers</h2>

<p>When writing papers, this framework is useful both as a starting point and as a way to structure the abstract and the introduction.</p>

<p>The abstract can be structured exactly as those four sentences. At least the first version – you may always expand or rework later. The introduction can be structured as a longer version: the first paragraph describes the problem, the second paragraph describes the consequences of the problem, the third paragraph goes into detail on the solution, and the fourth paragraph states the potential consequences of the solution.</p>

<h2 id="use-case-generating-startup-ideas">Use Case: Generating Startup Ideas</h2>

<p>In general, it is a good idea to express <a href="https://www.ycombinator.com/library/8g-how-to-get-startup-ideas" target="_blank">startup ideas as solutions to a problem</a>. The Procosoco technique is a good way to express your startup idea, as it includes both the problem and your solution in a succinct way.</p>

<p>And there is another nice benefit: it allows you to estimate the monetary value of your business, by answering the questions:</p>
<ul>
  <li><em>Whose problem am I solving?</em> and</li>
  <li><em>How much are they paying to solve that problem today?</em></li>
</ul>

<p>Multiply these numbers, and you get a first-order estimate of the potential monetary value of your startup idea.</p>

<p>Let’s use the above AI startup idea an example. In this case, <em>project managers</em> is the answer to the <em>whose problem am I solving?</em> question. A <a href="https://www.google.com/search?q=how+much+does+a+recruiter+cost" target="_blank">quick google search</a> suggests that hiring a recruiter may cost something like 20% of a candidate’s yearly salary – a good amount of money. So our business idea may be worth going forward with.</p>

<h2 id="conclusion">Conclusion</h2>

<p>Convincing people with your ideas is hard. Procosoco is a simple four-sentence technique that makes it easier. Try it out yourself to see how well it works!</p>]]></content><author><name>adam</name></author><category term="Ideas" /><category term="Startups" /><category term="AI" /><summary type="html"><![CDATA[Pitching ideas is hard. This makes ideas die too early – even brilliant ones.  Here is a simple way to pitch ideas, which I have chosen to call “Procosoco” despite it being a somewhat silly name. It makes your ideas easier to understand – and, as a bonus, improves the quality of the ideas. The technique is simple. Just describe your idea using four sentences: State the problem Describe the consequences of the problem State the solution Describe the consequences of the solution And that’s it! The trick is simply to structure your idea into these four sentences. Let’s look at a few examples: Example: Lunch We are hungry. This makes us grumpy and unproductive. Let’s go to lunch. When we’re back, we’ll be happy and productive again. Example: A new AI model Today’s AI models are extremely expensive to train and run. This makes generative AI available only to a few large corporations. We present SlideRuleGPT, a new AI model that can be run on a single slide rule This makes generative AI available to anyone, even without Internet access. Example: A new AI startup Project managers find it difficult to identify and recruit the right people to work on new projects. This leads to projects being delayed or fail. We provide an AI bot that reads the project plans and identifies the perfect people for each project. This makes projects complete faster and with better results. So the general structure is this: Problem Consequence Solution Consequence I’d like to call this technique Procosoco, which simply is a contraction of “problem / consequence / solution / consequence”. The origin for this technique is a brief comment by Kent Beck on how to write effective abstracts for research papers. The comment appears in a post from 1993 titled “How to get a paper accepted at OOPSLA”. The comment is: I try to have four sentences in my abstract. The first states the problem. The second states why the problem is a problem. The third is my startling sentence. The fourth states the implication of my startling sentence. I read this some 20+ years ago, and have since found this technique useful not only for writing research abstracts, but as a general tool for conveying ideas. The technique can also be used to help development and testing of ideas. If it is difficult to express your idea with this four-sentence structure, that is an indication that the idea needs more work. Is it difficult to express what problem your idea is solving? Others will feel it equally difficult to understand what problem is being solved and they won’t see how it could help them. So you need to work more on the defining the problem. Is it difficult to express the consequences of your solution? Then others may reject your idea since they don’t understand how it will make their life better. Then work more on your solution – or maybe try a different solution? Let’s look at a few use cases. Use Case: Writing Papers When writing papers, this framework is useful both as a starting point and as a way to structure the abstract and the introduction. The abstract can be structured exactly as those four sentences. At least the first version – you may always expand or rework later. The introduction can be structured as a longer version: the first paragraph describes the problem, the second paragraph describes the consequences of the problem, the third paragraph goes into detail on the solution, and the fourth paragraph states the potential consequences of the solution. Use Case: Generating Startup Ideas In general, it is a good idea to express startup ideas as solutions to a problem. The Procosoco technique is a good way to express your startup idea, as it includes both the problem and your solution in a succinct way. And there is another nice benefit: it allows you to estimate the monetary value of your business, by answering the questions: Whose problem am I solving? and How much are they paying to solve that problem today? Multiply these numbers, and you get a first-order estimate of the potential monetary value of your startup idea. Let’s use the above AI startup idea an example. In this case, project managers is the answer to the whose problem am I solving? question. A quick google search suggests that hiring a recruiter may cost something like 20% of a candidate’s yearly salary – a good amount of money. So our business idea may be worth going forward with. Conclusion Convincing people with your ideas is hard. Procosoco is a simple four-sentence technique that makes it easier. Try it out yourself to see how well it works!]]></summary><media:thumbnail xmlns:media="http://search.yahoo.com/mrss/" url="https://dunkels.com/adam/assets/images/pitch-ideas/pexels-caleboquendo-3162020.jpg" /><media:content medium="image" url="https://dunkels.com/adam/assets/images/pitch-ideas/pexels-caleboquendo-3162020.jpg" xmlns:media="http://search.yahoo.com/mrss/" /></entry></feed>